
At one of our German customers, we support the maintenance and feature development of a long-standing web-application. In this application, many different roles interact with another to achieve the completion of a common goal – the maintenance and repair of giant, hangar filling industrial machines.
No doubt, for our tester in the team, this can be cumbersome. For testing many features she has to log in and logout many times in different roles, to assure the correctness of even small parts of the process. The login and logout progress unfortunately are not quick, as the application is hooked into a multi-layered corporate Single Sign-On process, involving an IoT-platform. Developers also (let’s face it) we sometimes take the short route and don’t test enough with every role when we should.
Automated testing is not available to the extent we want it, so manual testing takes its place. If this sounds familiar to your project then that’s what we can help you with.
Your first Chrome extension
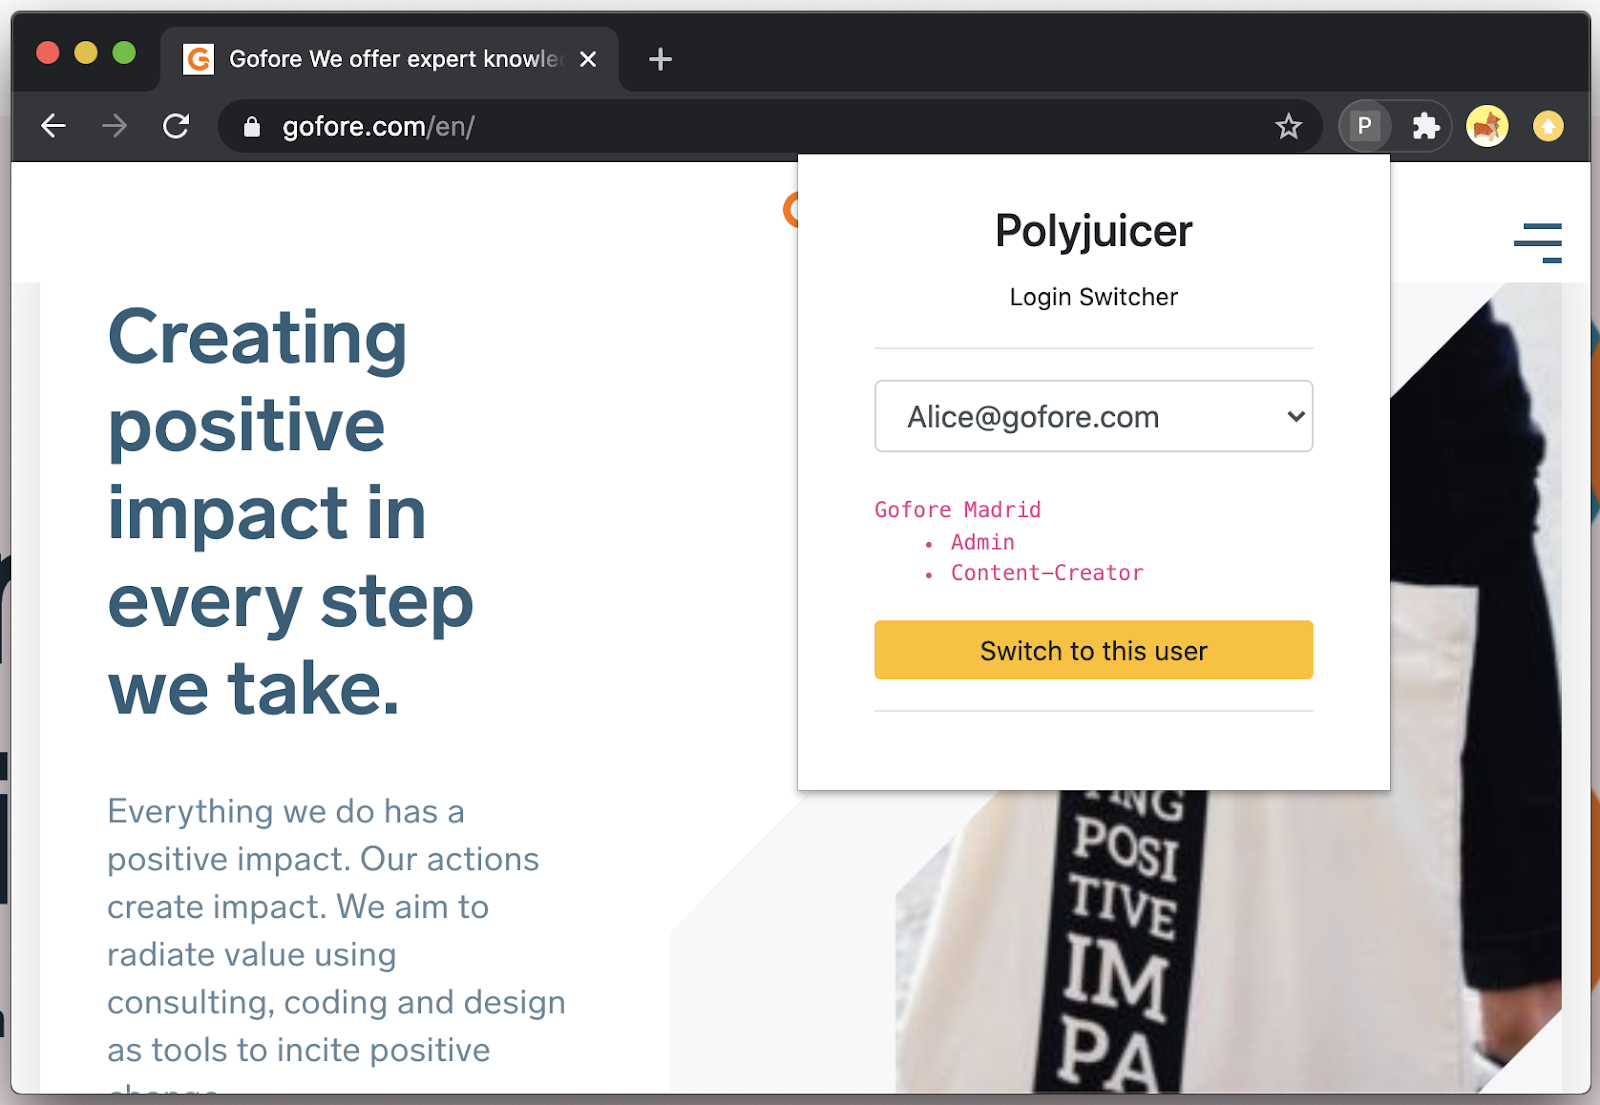
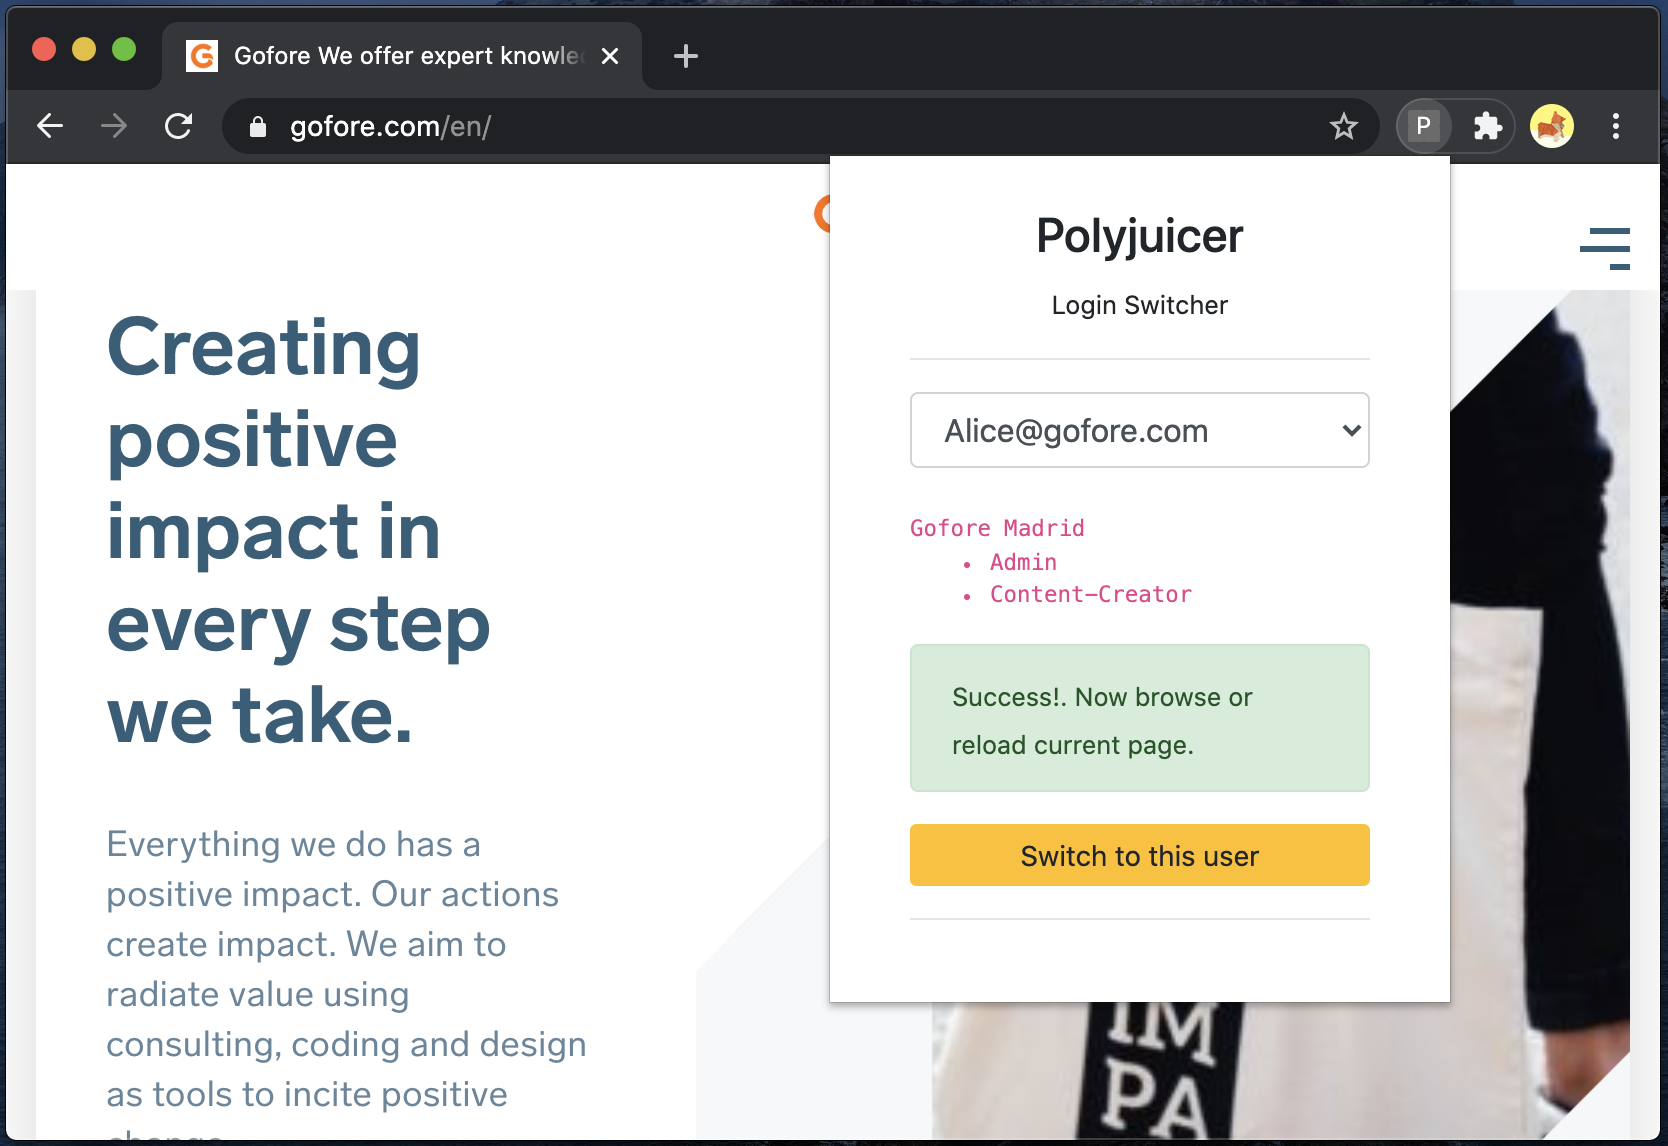
Meet the Polyjuicer (full source code). Once installed, the Polyjuicer allows you to switch the currently active user in your browser without going through the steps of first logging out, looking up the correct test credentials, then logging in again. A project-specific problem perhaps, but surely not a unique one.
It builds on an authentication process well known these days in web-applications, where a user authenticates at an authority to receive a JSON Web Token (JWT) which is then sent together with every future request to the application server. The following drawing summarises this (industry standard) process:
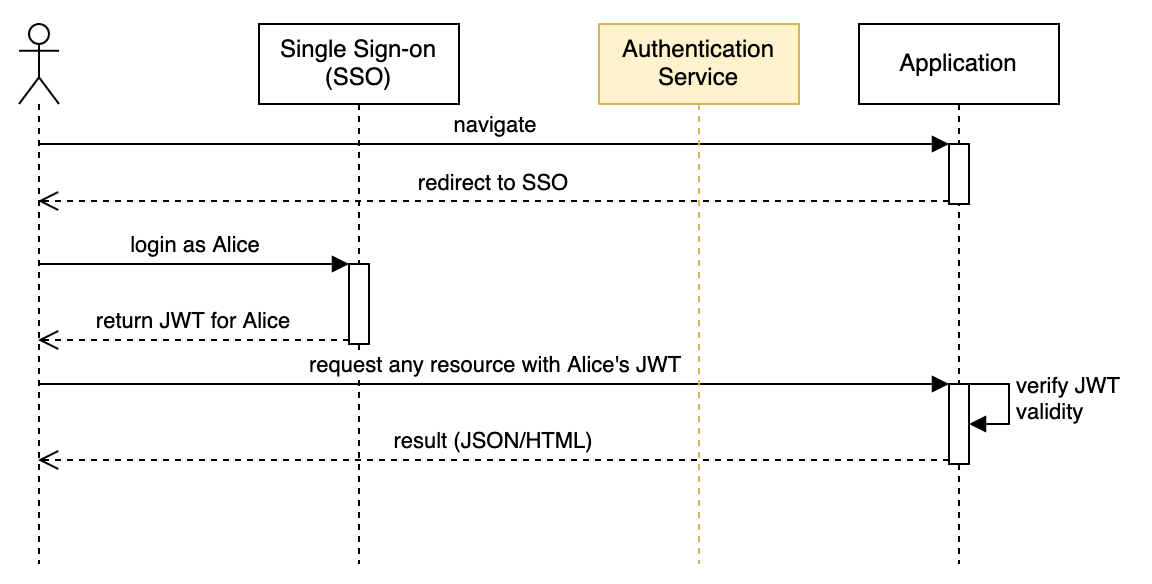
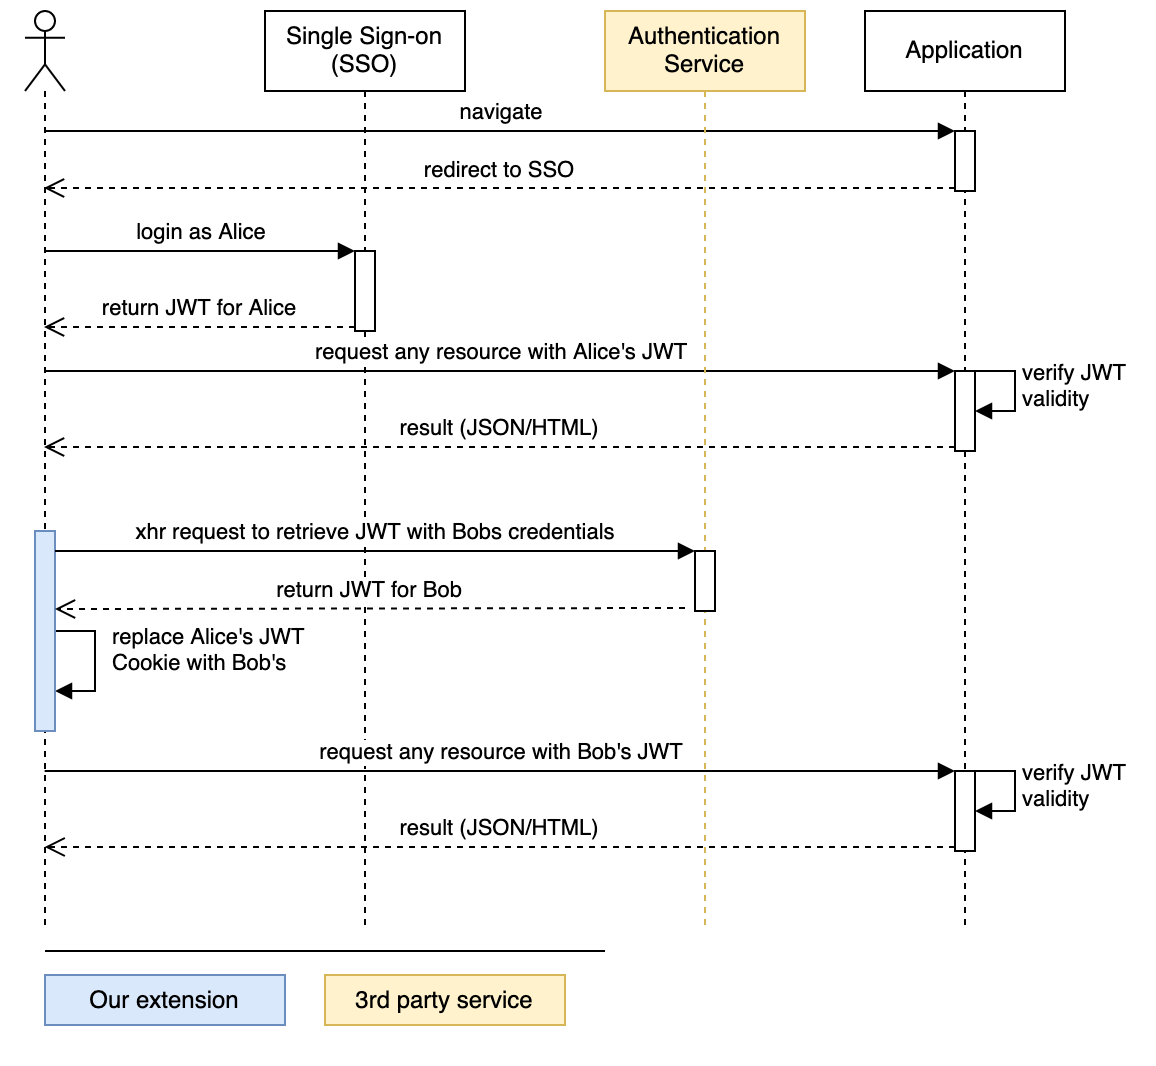
The browser extension we are building together will hook into this process. Before we start there is one requirement that makes this whole adventure work:

Having that said, we can already put our extension into the grand schema. As one UML-schema says more than a thousand words we leave you with this:
Our Chrome extension boilerplate
Chrome extensions are written in JavaScript (JS), but we are leveraging the power of Typescript (TS) and then transpile and bundle it with the help of webpack. We will not be going into how this setup is done, but instead, accept it as boilerplate and focus on the extension’s specific mechanics. jQuery is used as a JS framework to do some of the more verbose lifting of JS and help achieve a more readable syntax.
You can find the boilerplate for the code in this repository on the init branch. Best check out the init branch and navigate to that directory now. You will find the following structure:
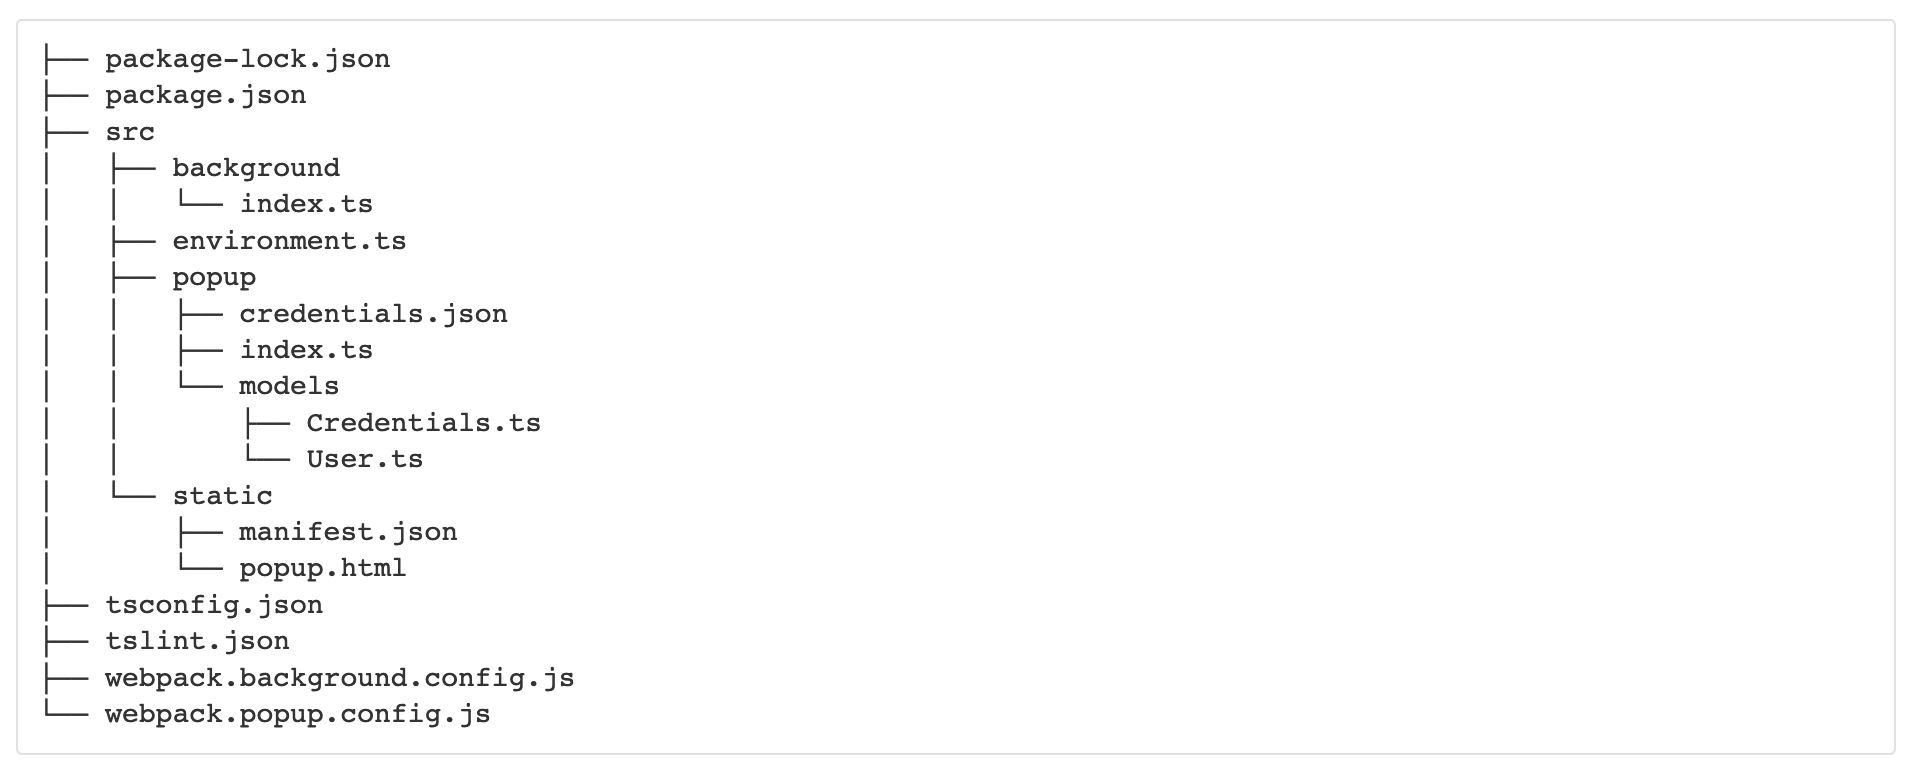
As the directory structure suggests, our extension can be divided into two main parts:
background and popup. This is due to the inherent nature of Chrome extensions.
- The popup is the part the user interacts with. It is there for handling all the user interactions. For convenience reasons, we also place our credentials.json file in this directory. This file holds some fictitious credentials, following typing by the interfaces in the model subdirectory. Go there and get familiar with those interfaces. All our user interaction logic will be placed in the index.ts in the popup folder and we will also call most Chrome APIs from there. Unfortunately, not all Chromes extension APIs can be utilised through the popup scripts.
- Some Chrome APIs can only be called by the background script. We will later get to why we need this, for now, we have an almost empty index.ts file in the background directory.
Background scripts, the popup, other metadata, and permissions are linked via the important manifest.json, a file we will see more of later and which we placed in the static subdirectory. This directory is holding some resources that are only barely altered and are not containing TS or JS. Both files will be continuously copied by webpack during the build process into the extensions root-directory.
Buckle up & start the engines
From here, we just need to start our continuous local build process. Run npm install and then npm run build:watch from the terminal to keep webpack constantly rebuilding your changes. You will notice a new dist directory appearing. To load the (yet unsuitable) Chrome extension navigate to chrome://extensions/ and activate developer mode and click on load unpacked. A new icon will appear in the list of your installed extensions, next to the browsers address bar. Just click on it to see the popup. You are good to go. Every change you do will automatically result in a new compilation. Pressing the update button in the extension menu is advised after each change. It’s a good suggestion to remove and re-add the extension when you experience old, unexpected behavior.
On checking console output
There are different ways of checking on console.log output, depending on which part of the extension we look at:
- For the popup you can access Chrome’s developer console by first clicking on the extensions icon and then right click inside the appearing popup and choose “Inspect”.
- On the background scripts there is a link for each installed extension you can click on chrome://extensions/ which will lead you to this separate inspection window.
The popup user interface
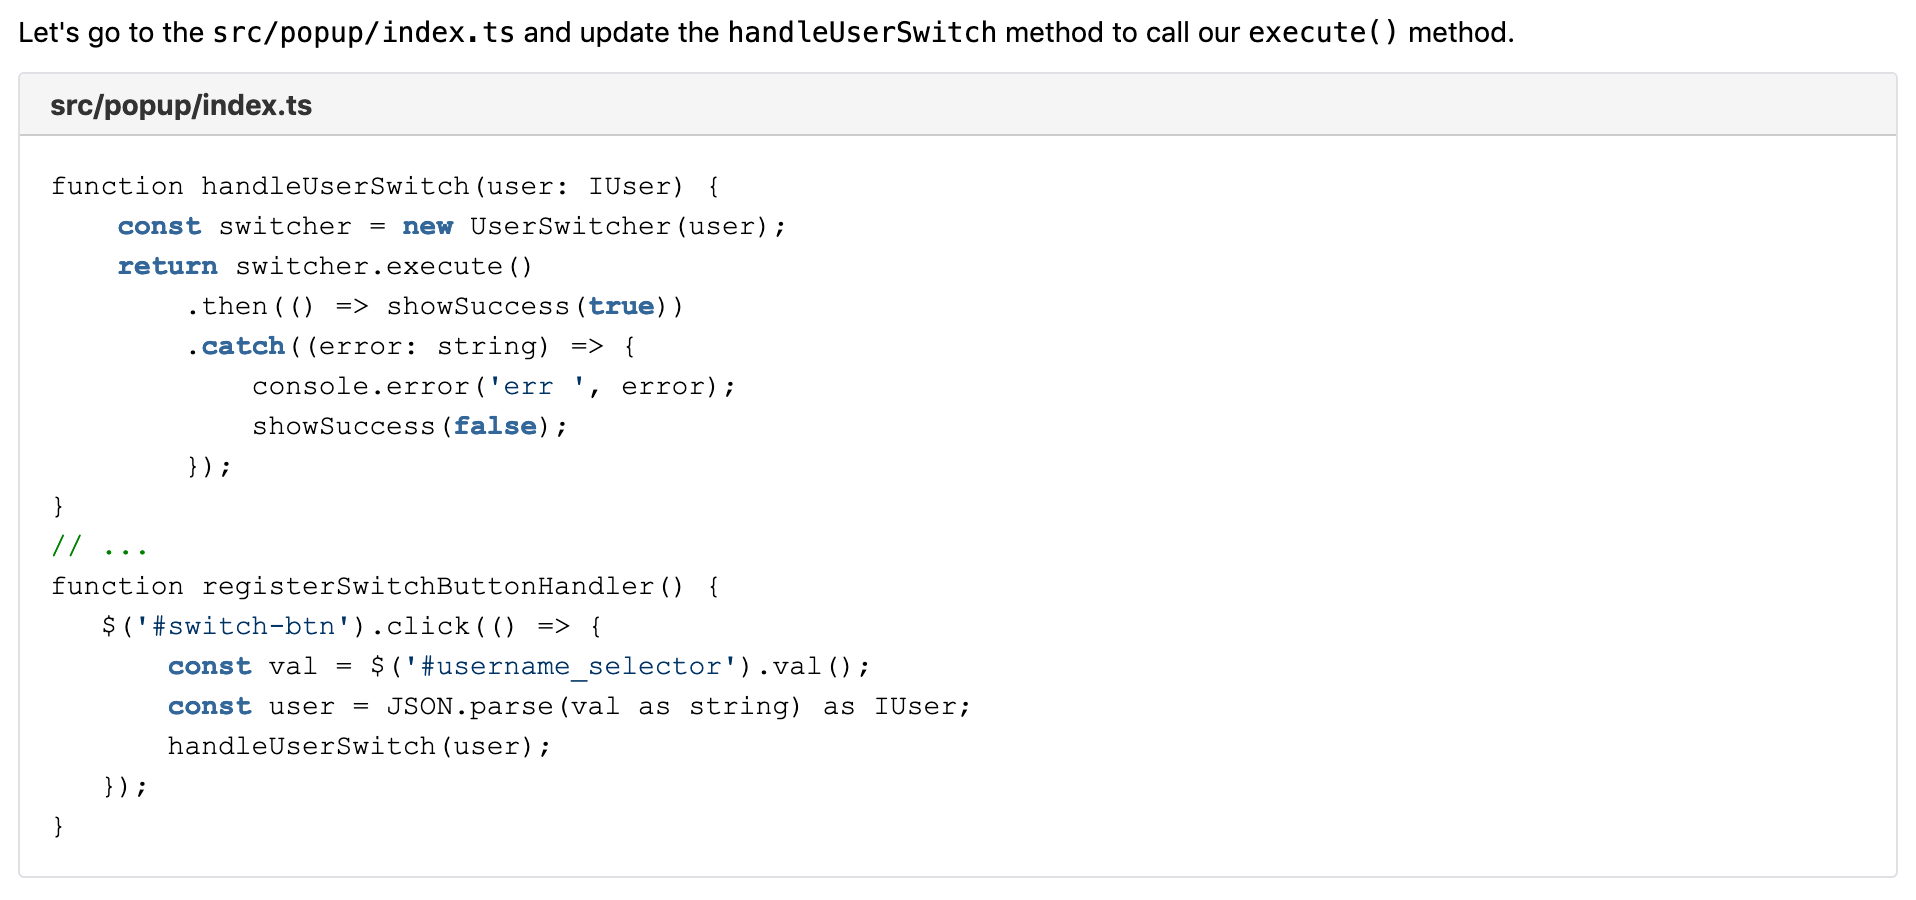
We already prepared all the HTML and UI JavaScript of the popup boilerplate for you. As everything else, you can see it is linked in the manifest.json, under the browser_action key. Take a look at popup/index.ts now to see how we load the credentials and register listeners. Interesting and unfinished here is the handleUserSwitch() which will be invoked when a user requests the switch action.
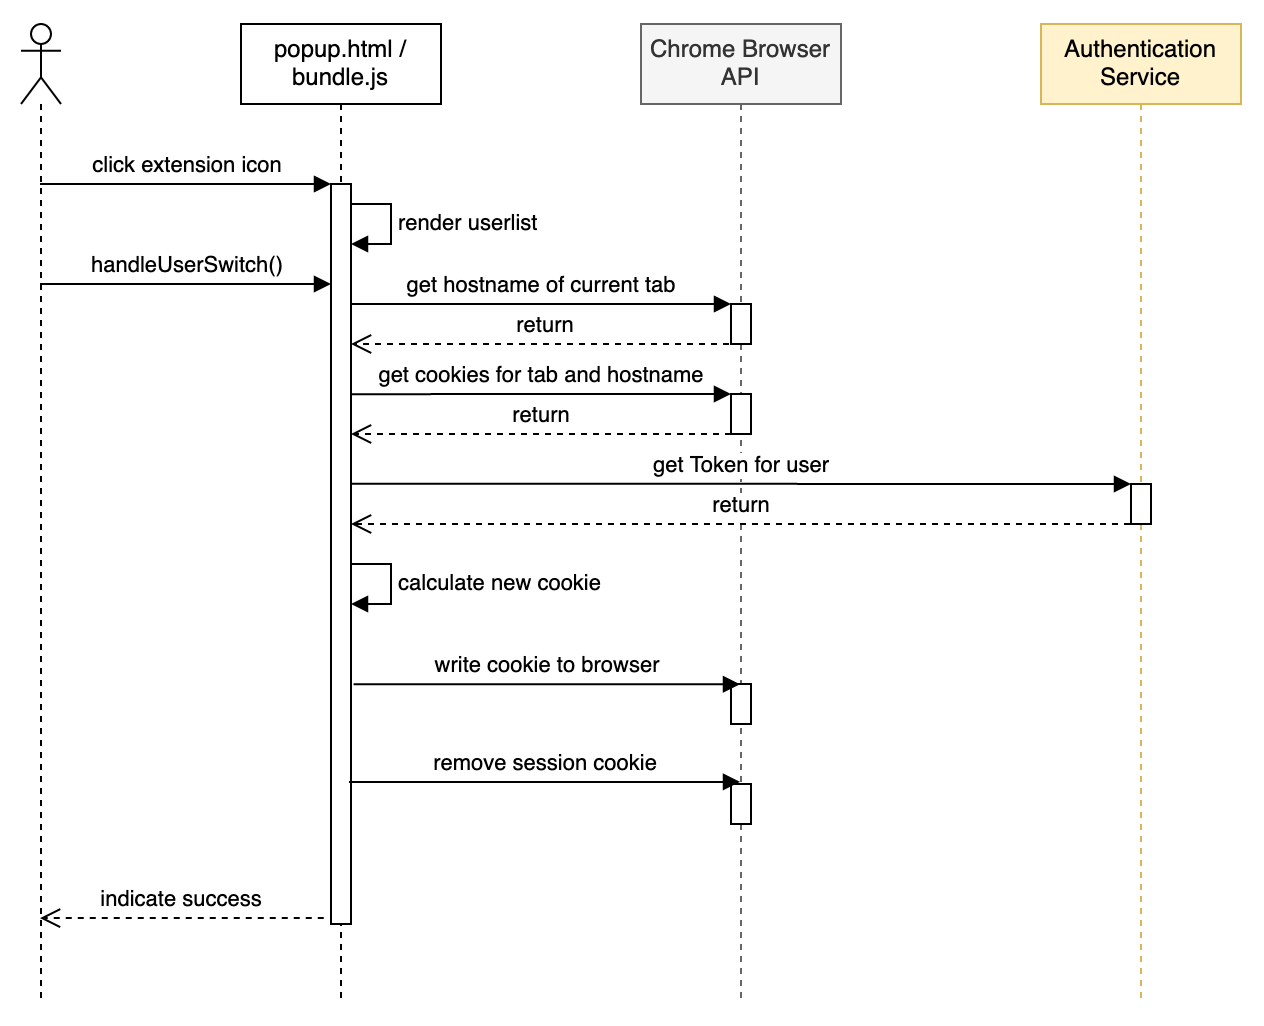
The next drawing outlines the steps we execute to achieve the full user switch. We will approach the problem in this order. In the process, we will have to query the authentication service, as well as Chromes Browser API for extensions.
For clean-code reasons, we are adding one additional layer, where we wrap Chrome’s API that works with callbacks into a promise resolving method. We do this step by step and for convenience reasons let a little bit of our logic get into it as well.
At first, we start by adding a new file and class to the popup directory.
Getting the current hostname and cookies
Let’s add our first code into our first new file. To get Chrome to tell us about the current tab’s hostname, we need to get the current tab from it. For this, we call to Chrome’s tabs API from our new static method.
We wrap this call into a promise which will resolve when a valid result is returned and to reject when unexpected behavior appears.
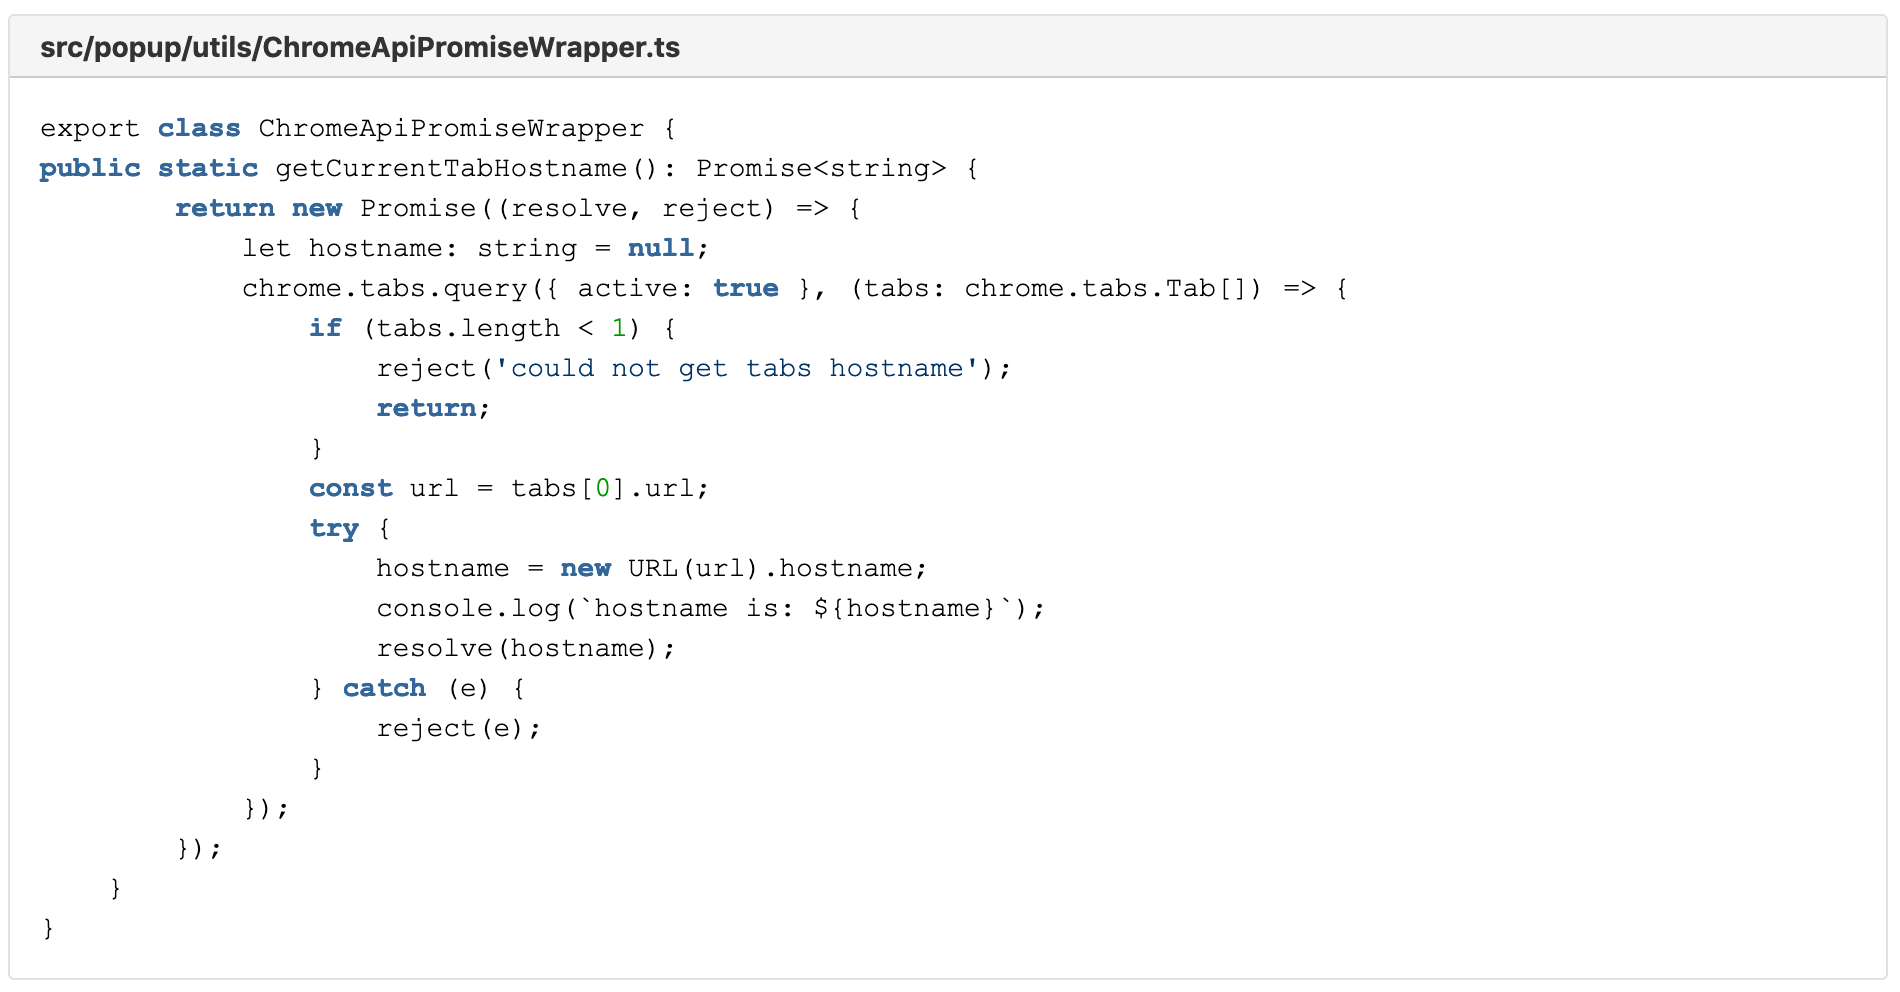
As you can see, we already try to extract the current tab’s hostname within this function, therefore muddying a little bit the waters of what a pure ChromeApiPromiseWrapper would suggest.
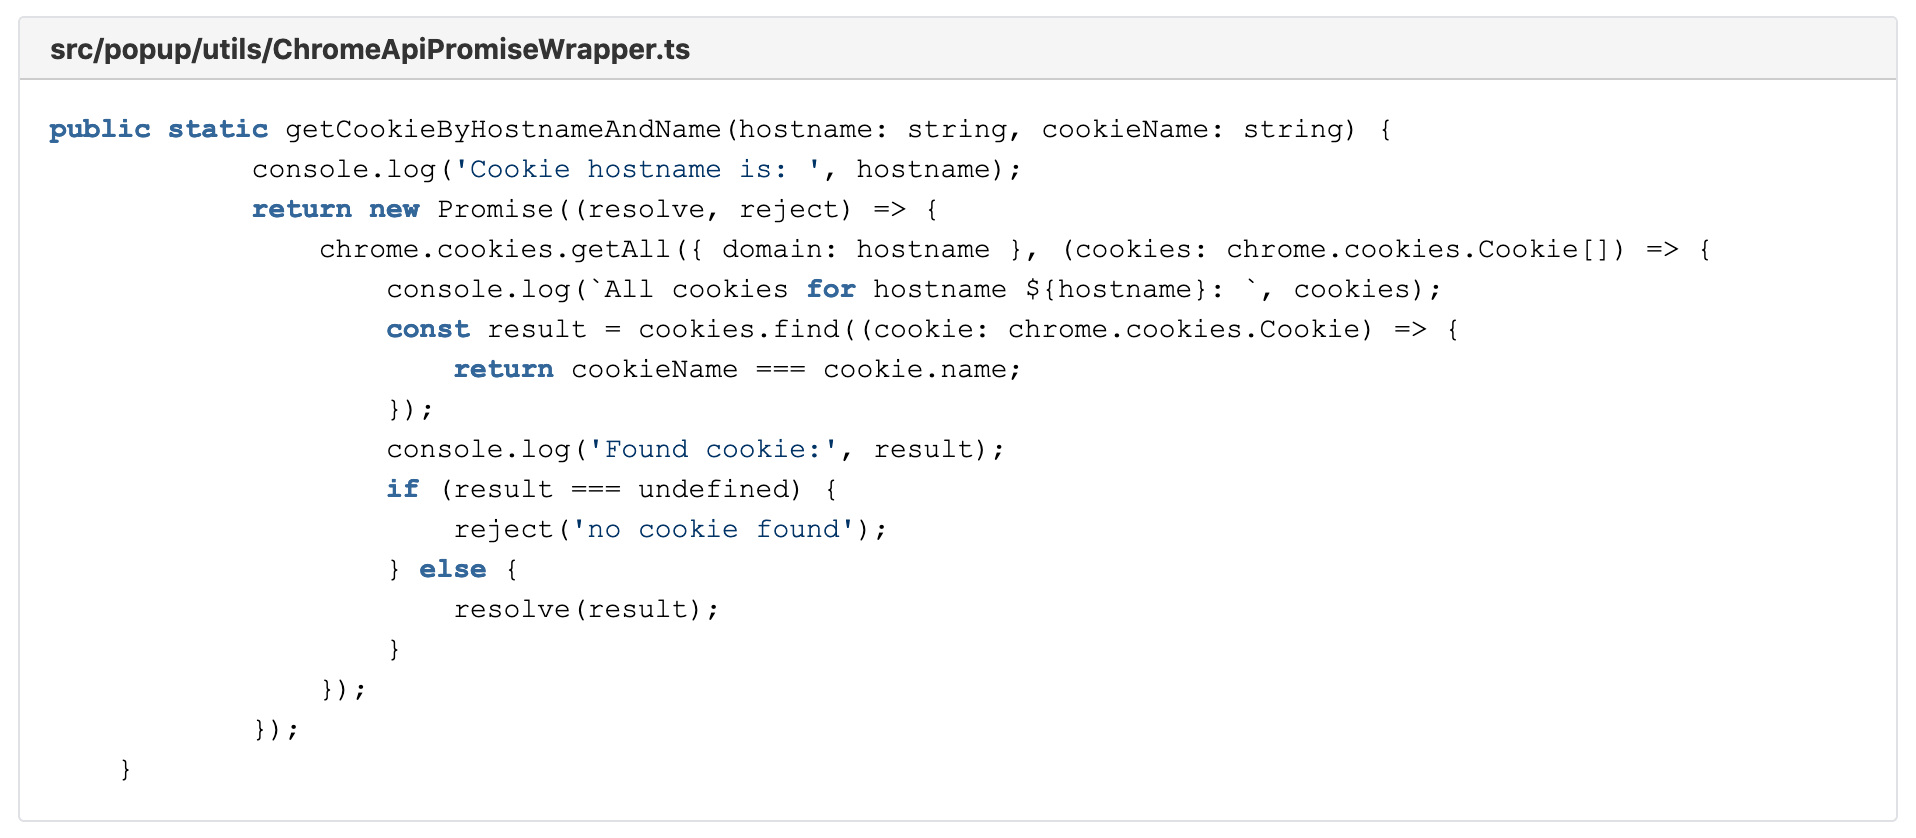
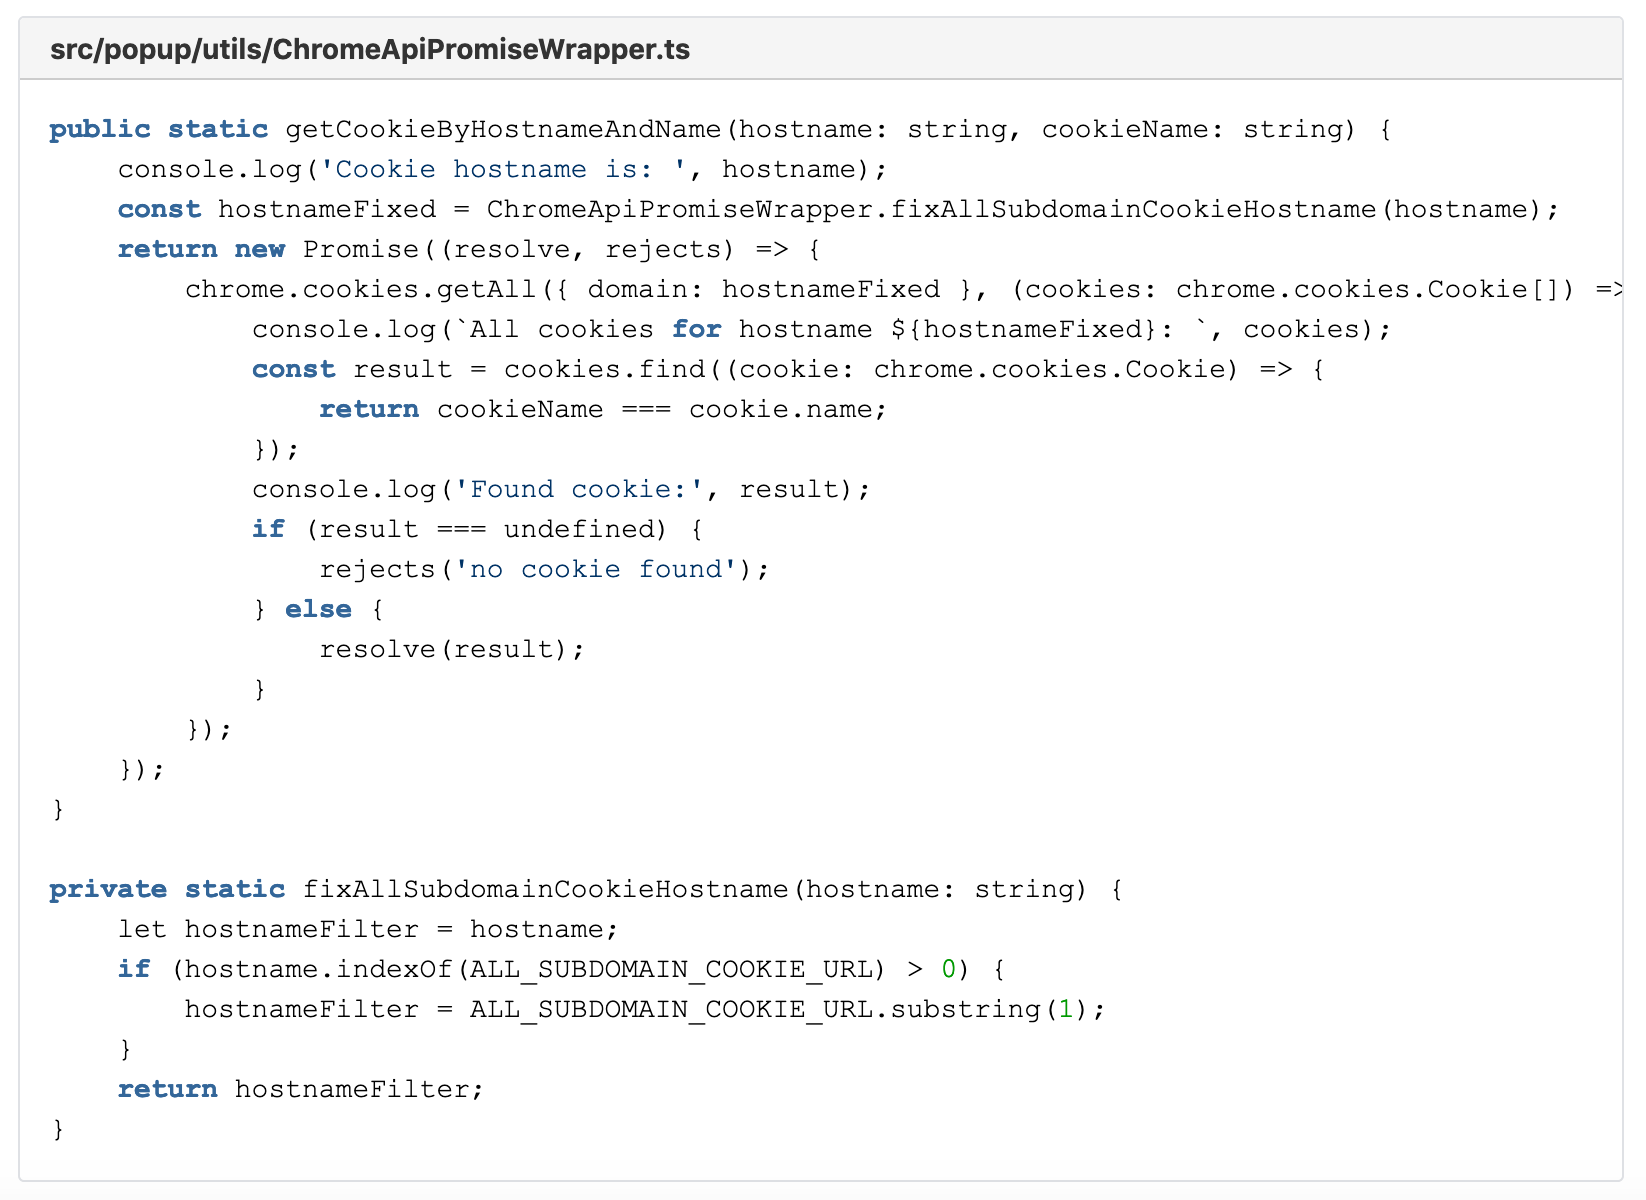
Now while we are at it, let’s add another function. The function getCookieByHostnameAndName() returns to us the first cookie to a matching hostname, filtered by its name. We resolve the promise if we find such a cookie and reject it if we find none.
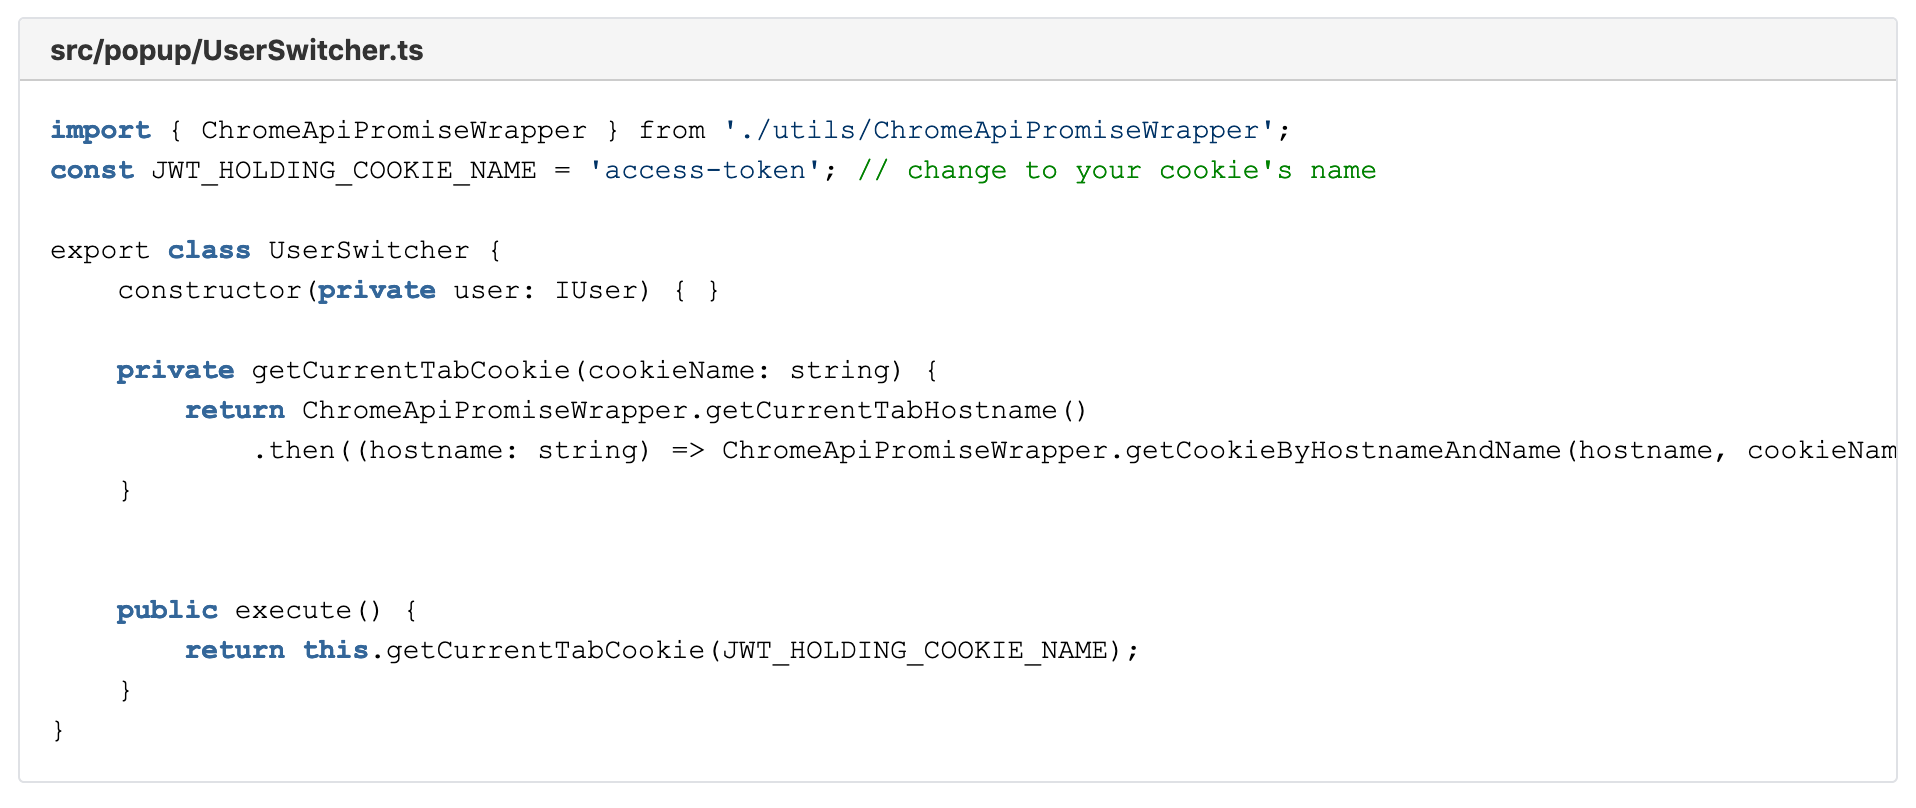
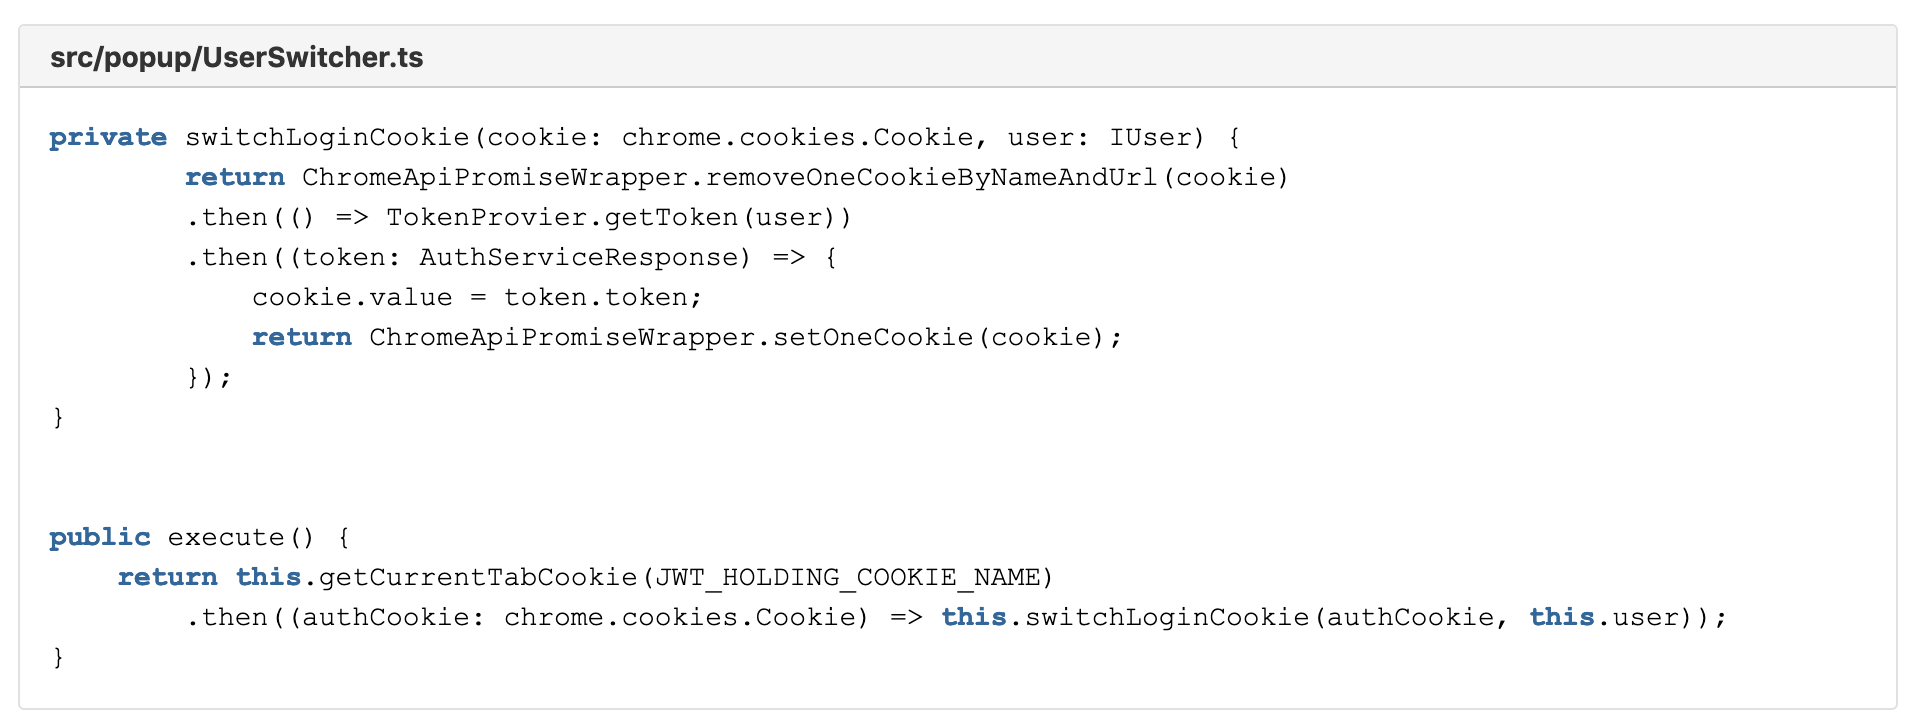
Having those two functions ready, we can bring them together in a good promise fashion in a combining method within a new class, the UserSwitcher. We call the method getCurrentTabCookie() and it uses the Promise.then() functionality. As this method returns a promise itself, it is easy to reuse it in our main entry function to the UserSwitcher, the public execute().
Linking the button
Before we can continue with implementing the execute method, we want to be able to early test what we are doing. For that, we need to link the button with the execute function.
Switching our authentication cookie
We continue by changing the content of the discovered cookie with a new value, the value we receive from the authentication service (called via TokenProvider). We must update our execute method in the UserSwitcher to call this new method.
It becomes clear that we need two more wrappers in our ChromeApiPromiseWrapper:
- removeOneCookieByNameAndUrl()
- setOneCookie()
And also the TokenProvider. That will come a bit later.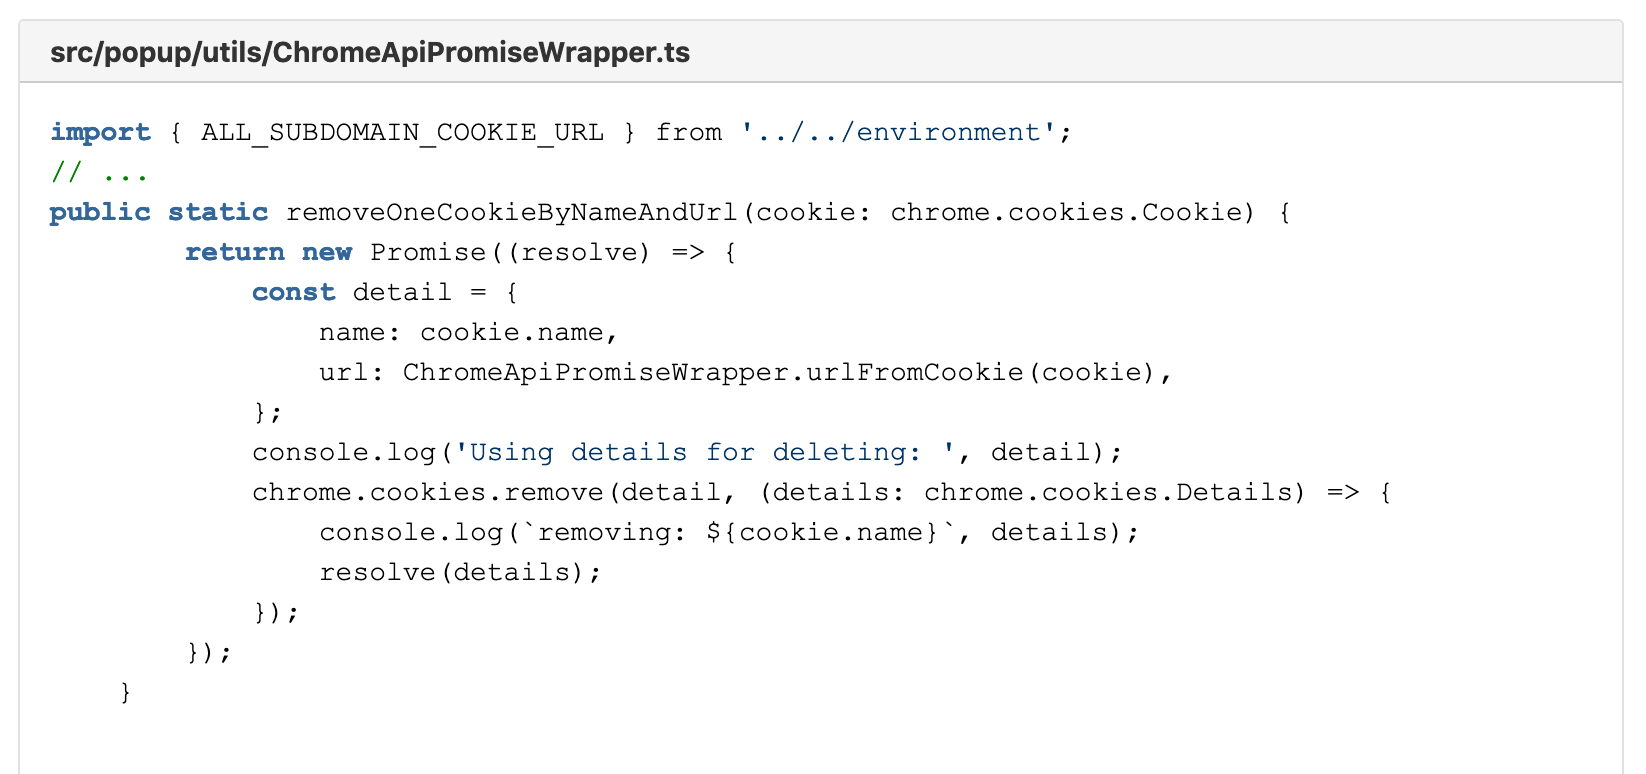
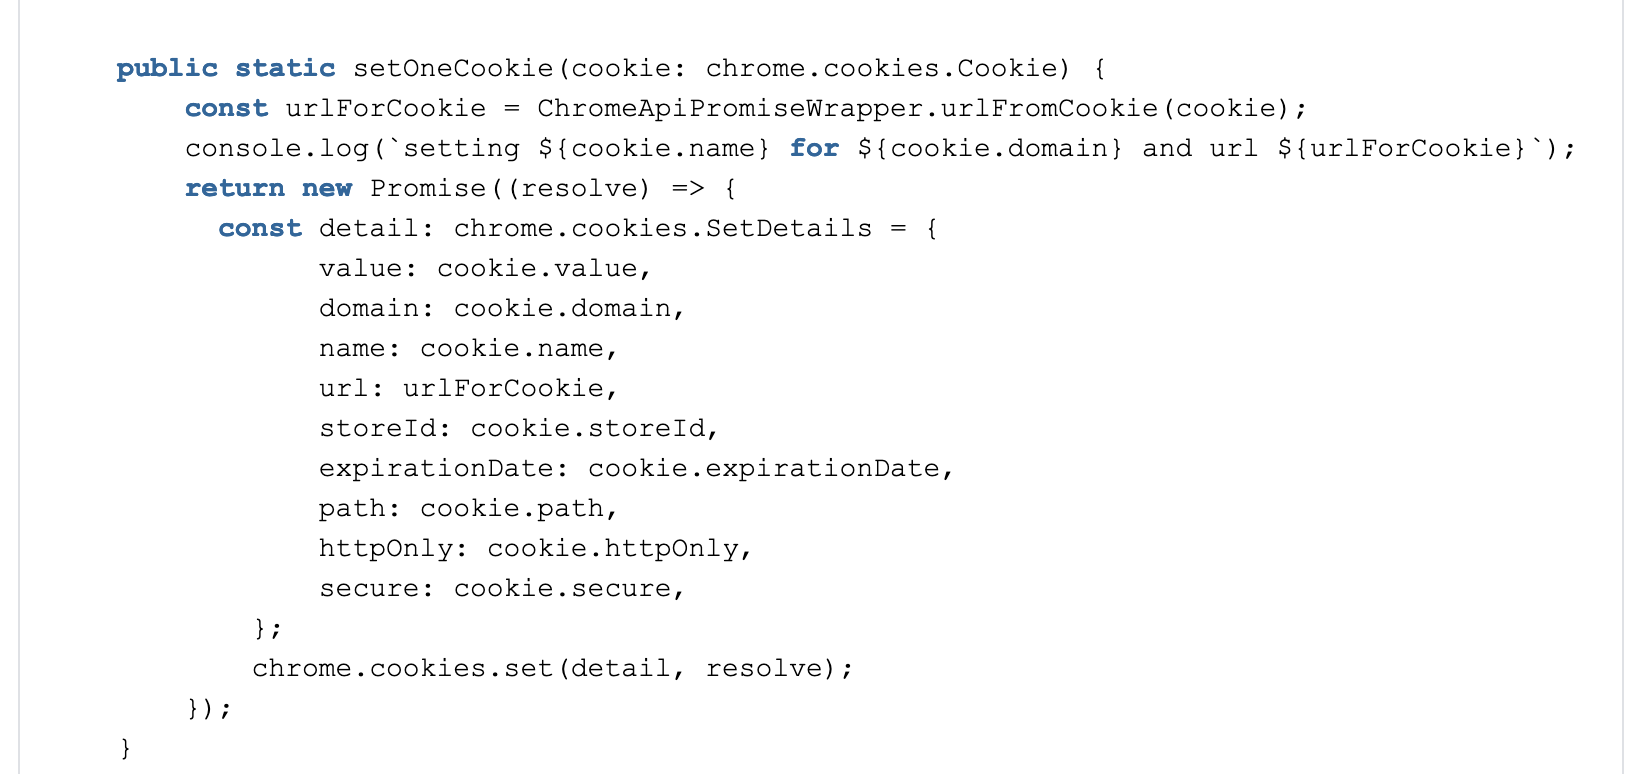

A couple of things are noteworthy in these new methods. At first our two new public functions all never reject their promise. This is simply because, at the time of writing this, Chromes API simply gives no feedback if the action was successful or not.
Also, you will notice that our new cookie uses most values from the old cookie, including the expiration date. For the context of this extension, this is an acceptable simplification.
At last the additional function urlFromCookie. This is creating a url from the old cookie’s data, which is needed as new cookies are saved with the URL-information, but when queried they do not return this parameter.
Also, we can see one specialty: Cookies that are valid for an entire subdomain start with a dot “.” but are not accepted like that by Chrome (e.g. “.gofore.com”). We, therefore, strip it of the leading dot.
This problem actually applies also for our previous function getCookieByHostnameAndName() in a slightly different form. We can revisit and add it like this:
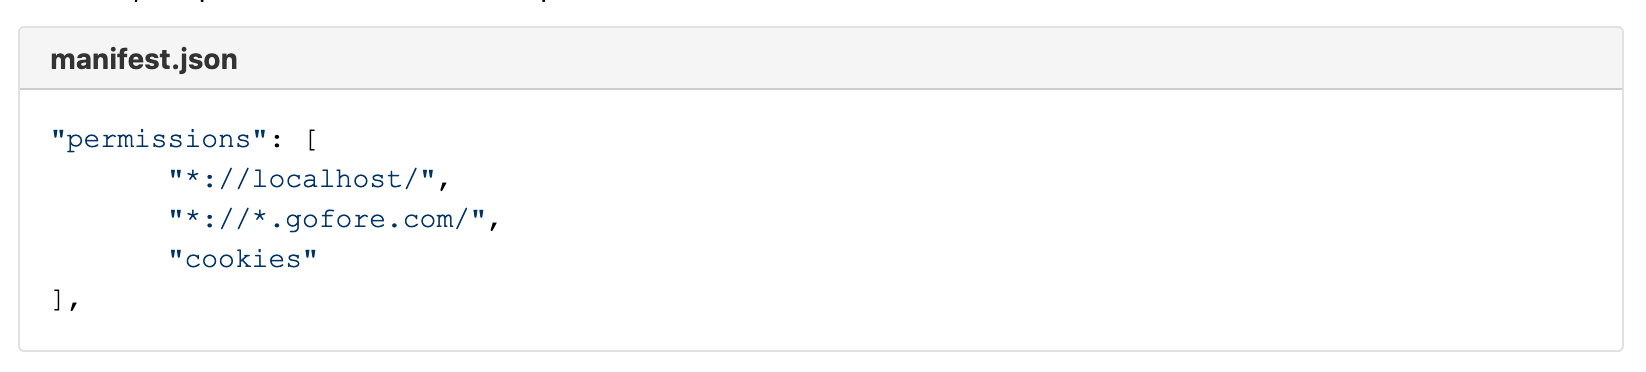
Now, if you try out the changes, you will see that they will not work. That is no surprise – but by design. To make this work, you first need to give our Chrome extension additional permission. All permissions are requested from the manifest file. Here it is, the permission “cookies”. The permission-section should now look like this:
The next thing missing is a new class, which acts as a service to retrieve our JWT from the authentication service. We have heard before from this, it is the TokenProvider.
Getting the JWT from AuthService
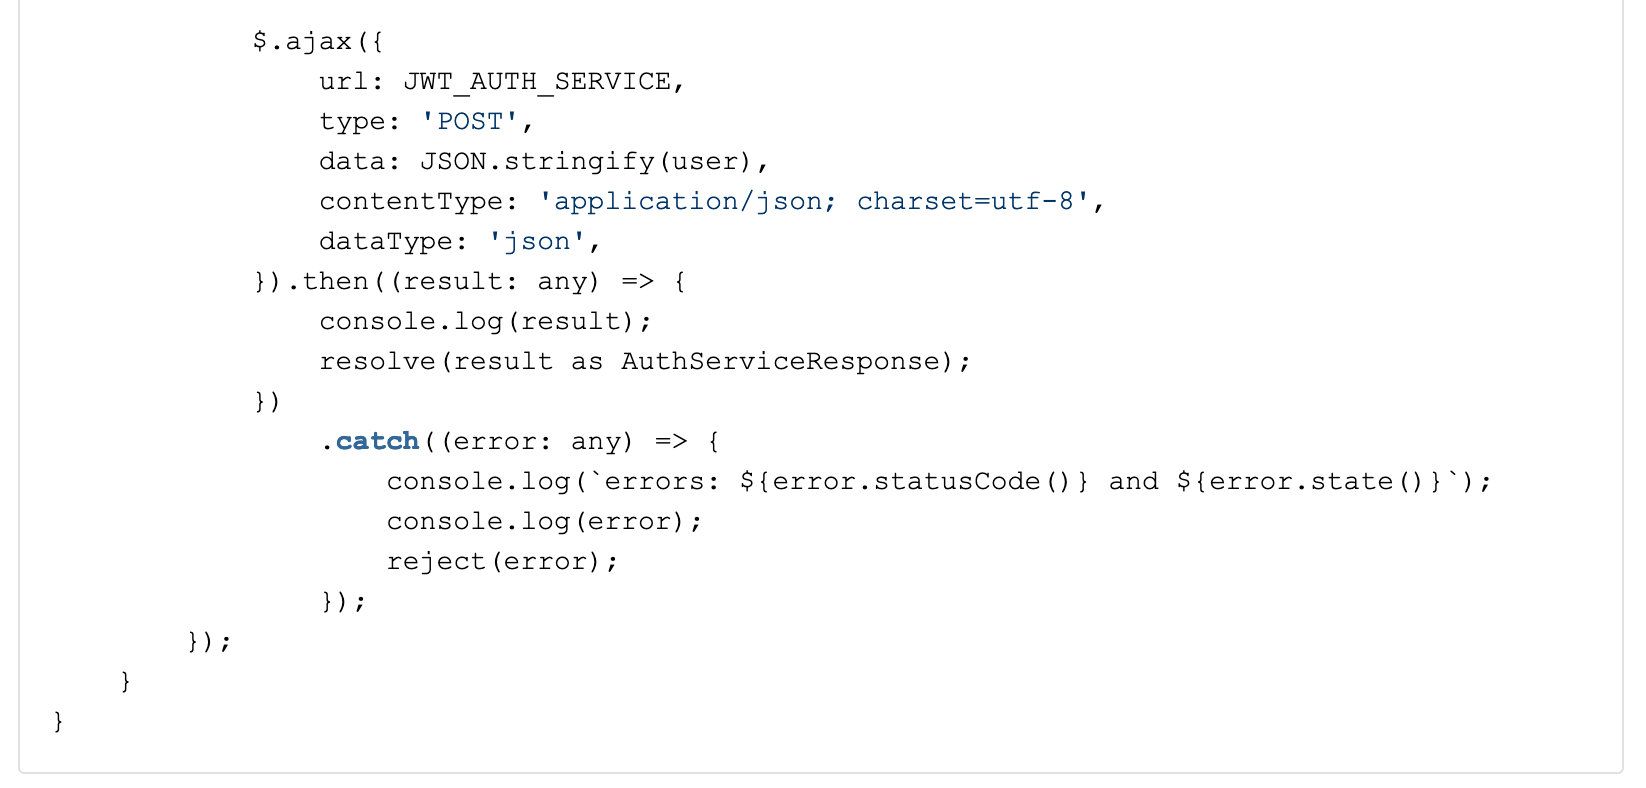
For receiving the new JWT we create a new file TokenProvider.ts. The following implementation is obviously highly dependent on the service your project has available. We use a jQuery ajax request to send a formatted JSON to the service. The request can be adapted to your project’s needs by changing the data attribute. Luckily for us, our IUser interface matches exactly the serialized JSON request the service expects. The request’s result matches exactly the AuthServiceResponse so we wrap our jQuery callback function into a Promise.resolve call and reject whenever there occurs an error.

Delete the session cookie
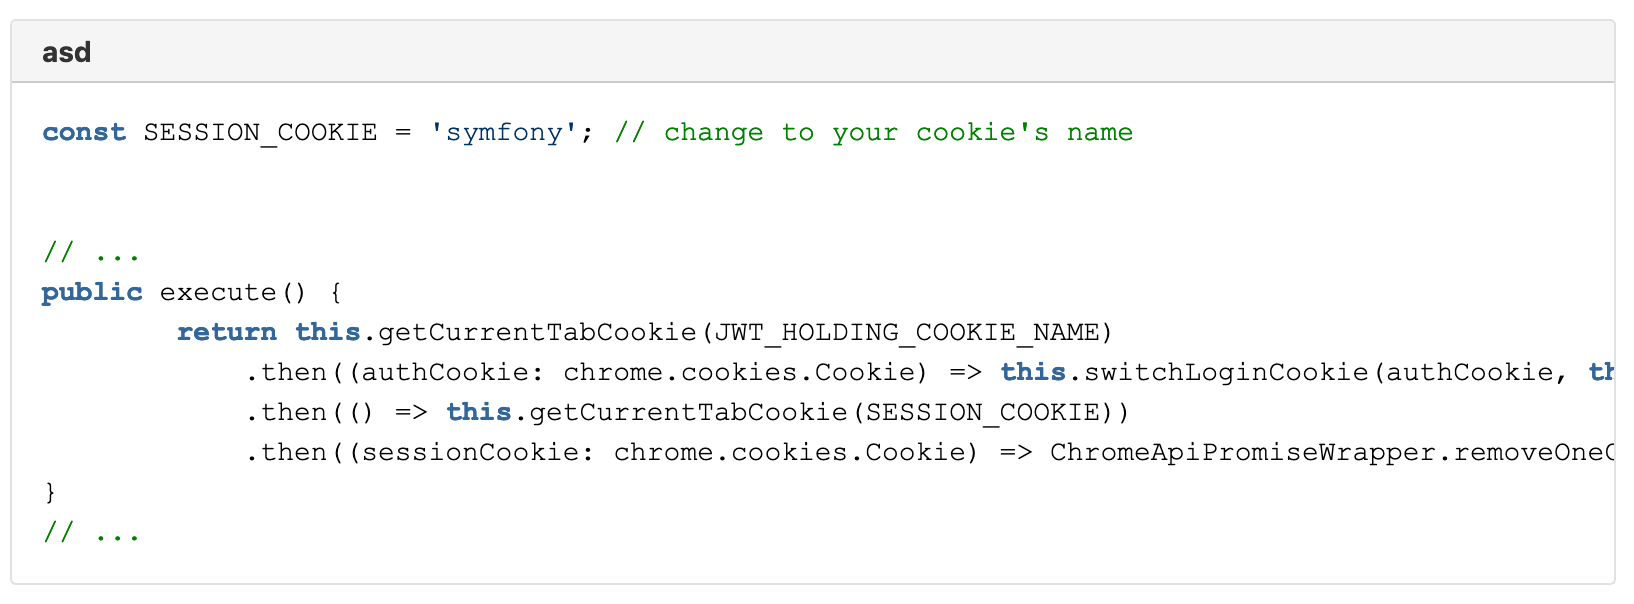
The last thing we want to do is to ensure that our application does not mix-up the new authentication data with stored session data. If this is not a problem for your context, you can skip this part. But for our client, we decided that this is a reasonable precaution step to avoid holding conflicting session data. The solution is easy and pragmatic: we just delete the session cookie. The application’s web-server will just instantiate a new session for us and it will be legacy free from our previous login. For this, we add the last functionality to our execute method in the UserSwitcher.ts. As it happens, we already have created that functionality, it’s the function: removeOneCookieByNameAndUrl(). Our execute function can therefore be updated to this:
Have you tested it yet? If not go test it and let the purposefully added console.logs guide you a little bit through the process or find possible errors.
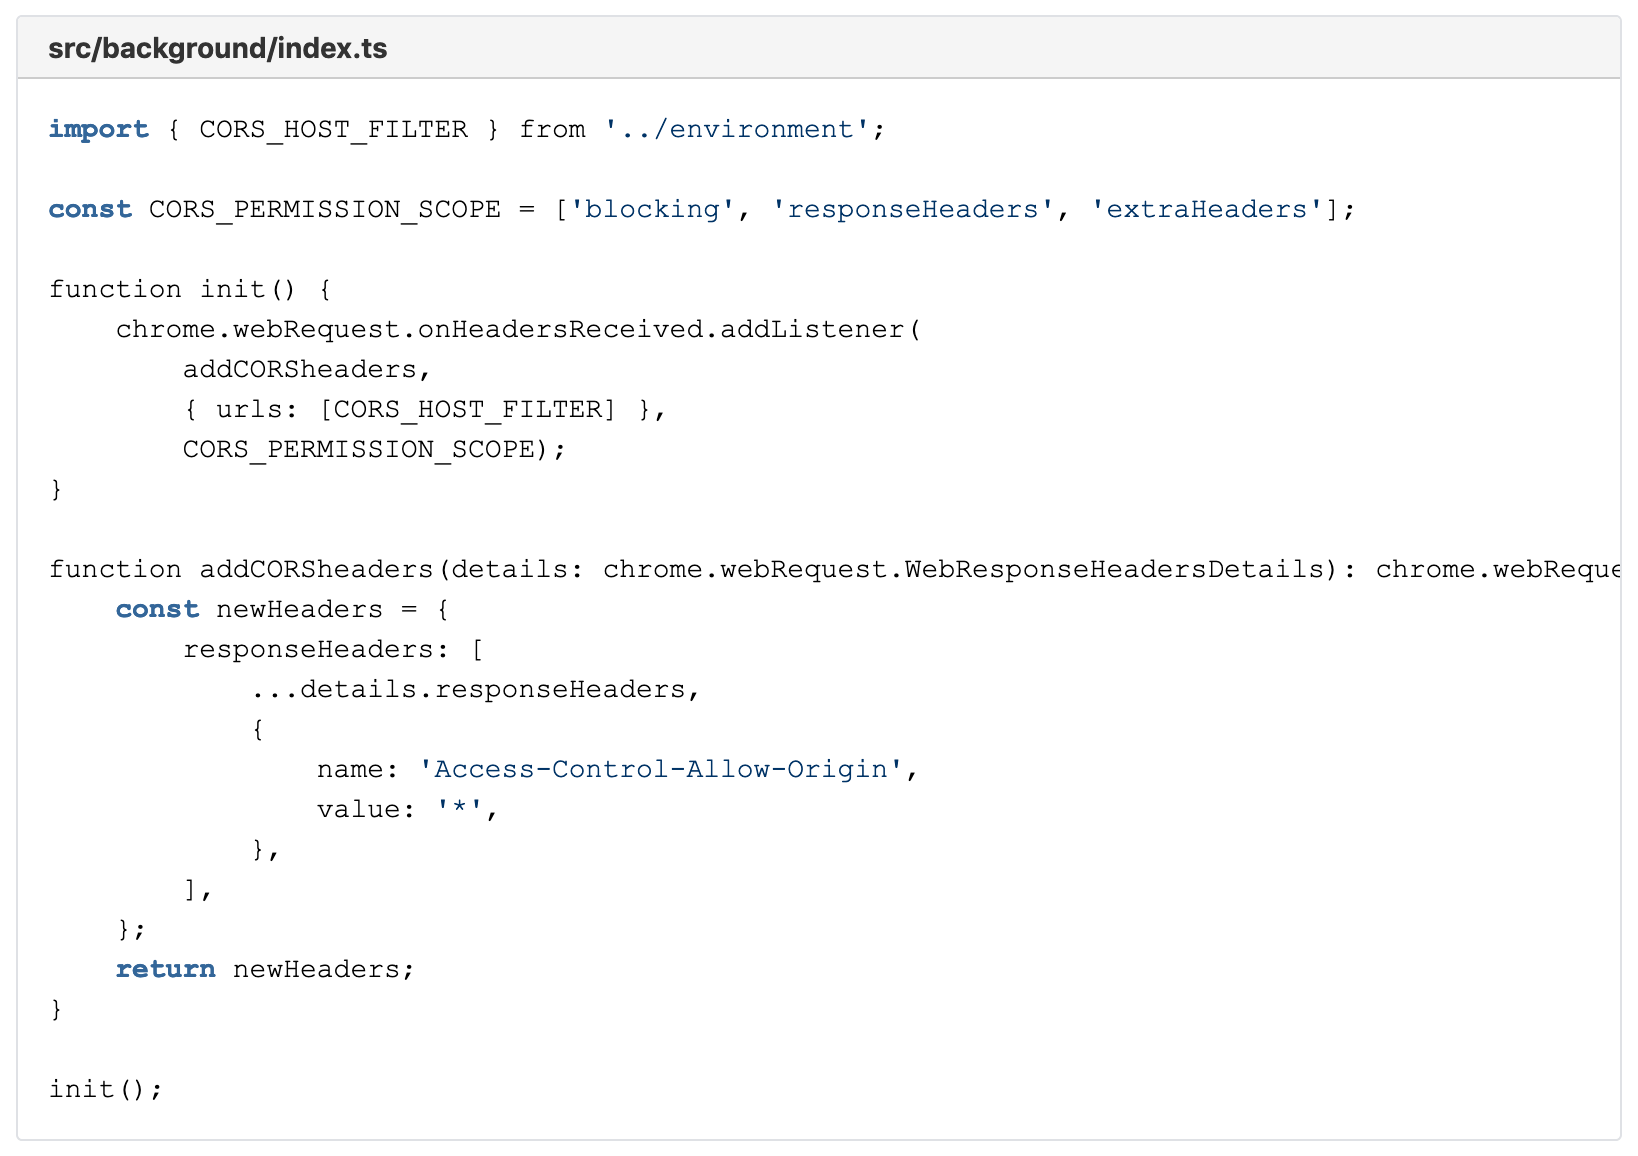
CORS and background scripts
In our project we faced the problem that the authentication service did not send permissive CORS headers, therefore making it impossible to receive data via the TokenProvider. If you have the same problem (you will notice if that is the case) and you have no way of convincing the maintainers of the service to add some less restrictive CORS headers to their service, then there is not a lot you can do but deceive your Chrome into ignoring CORS altogether.
This is where the background service finally comes into play. For this at first, we need to extend our permissions in the manifest.json for the following two entries:

Without these entries, Chrome can not give us access to parts of its API. Then we add content to the already existing init() function in src/background/index.ts. The CORS_PERMISSION_SCOPE is fixed and can be looked up in the Chrome Api. We add a listener that is called with the result of any web-request, only limited by CORS_HOST_FILTER. This function then adds a certain CORS header to the received response, allowing us to trick Chrome into believing CORS policies have been sent by the service in our favor. Suddenly the authentication service is not restrictive at all.
That is the entire Chrome extension. Make sure to update all environment variables and the manifest.json to match your project. From there you are good to go!
Final notes
Firefox compatibility
Chrome’s extension API is very similar to the one of Firefox, so there should be no major problem to modify your extension to work also with Firefox. The main difference is that Firefox works already with promises while Chrome is still working with callbacks. Additionally, check the incompatibilities pointed out by the Firefox team.
Troubleshooting
If you have any problems, check if the correct permissions and URLs are added to the manifest.json. Generally, Chrome’s inspector is of great help understanding the inner workings of the extension. When having problems with deceiving CORS, remember that Chrome’s code inspector is called from chrome://extensions page per extension. And it is always good advice to refer to Chrome APIs for breaking changes or other updates that might have happened since the release of this article.
Conclusion
We have successfully implemented a Chrome extension that supports our customer’s development and testing process. This highly convenient extension in our project is in use by many team-members every day. Your project might have different requirements, such as sending the JWT via a dedicated authentication header or accessing the authentication service with different technology. Based on this tutorial you should be able to adapt your version of the Polyjuicer to those requirements.
Check Gofore’s GitHub account and navigate to the repository to get the entire source code.
Are you interested in working with similar technology in modern teams and on interesting projects? Check out our open positions in an office near you!