At Gofore we frequently work in collaborative teams across our offices in Finland, Estonia, Germany, the UK and Spain. Recently I had the chance to join one such team run from the UK, working on a Social Data Science project. We held the project kick-off beside the sea in the Swansea office which was a great opportunity to, not only meet colleagues face-to-face but also to visit the local beaches.
The challenge was to display tweets relating to specific keywords within an app that was being built. One of the challenges was that to get this to work, every user had to be logged into the Twitter API. So, we wanted to develop an app that could automatically search for relevant tweets and import them into our separate app written in Angular. We also wanted to combine this data with other inputs to produce outputs that can be analyzed to produce actionable results in different views. Below I will show you how we decided to face this challenge.
Twitter sign-in flow in the browser
The first part of the task was to research the exact process and workflow that the user must pass in order to be able to sign in with the Twitter API, a quick visit to the Twitter developer portal, pointed me in the right direction with a guide to follow, however, Twitter uses the OAuth v1.0 protocol to sign in users and so we also needed to understand how that works.
We decided to follow a 3-step process:
1.Obtaining a request token
In the first step, we send a signed POST message to ‘https://api.twitter.com/oauth/request_token’ with the Authorisation header as we see in the guide, and with the help of Postman, we get all the headers required:
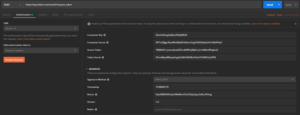
Where the consumer key, consumer secret, access token and token secret being provided by the Twitter app that we created and will be explained further later. The timestamp is just the unix timestamp at the time of the request and the nonce is just a random string generated by the client.
This returns the OAuth Token, the OAuth Token Secret and confirms that the app we created has a callback URL.
2. Redirecting the user
The next step is to redirect the user to the OAuth authentication URL ‘https://api.twitter.com/oauth/authenticate?oauth_token=XXX’ where you should replace the oauth_token with the one you got in the previous step and this renders the webpage to sign in with your Twitter account, like this:
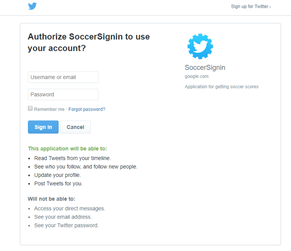
Here, you just enter your Twitter credentials and the Twitter API takes care of signing you into the application.
3. Converting the request token to an access token
After you are successfully signed in to the Twitter API, you are redirected to the callback URL that you used when you created the Twitter application and adding the OAuth Token and OAuth verifier to the URL, like this example: ‘http://localhost:4200/twitter-login?oauth_token=XXXX&oauth_verifier=YYYY’. In this case, we use ‘http://localhost:4200/twitter-login’ as the callback URL and we got XXX and YYY as the token and the verifier, respectively.
With this, you need to send a POST request to ‘https://api.twitter.com/oauth/access_token?oauth_token=XXXX&oauth_verifier=YYYY’ to get the OAuth access token and OAuth token secret as a response which you need to send authenticated requests to the Twitter API in the future.
Creating the Twitter app
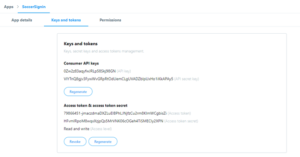
After signing in to the developer portal with your Twitter credentials, you need to create an application filling all the requirements that Twitter presents to you. We already had one app created, but we created another one for testing purposes. For you to create an app on the developer portal, you need to write the application description, the website URL (this one can be any one of your choice, even https://www.google.com), but the most important thing is to enable the ‘Sign in with Twitter’ option and provide a callback URL. This is where the Twitter API will redirect you after you are signed in their API. In this case, we simply created a specific route in the Angular application for a new component that displayed a success message and then closed the page after registering the token in the database with the user information.
After creating the Twitter application, we get four unique values: API key, API secret, Access Token and Access Token Secret, that we need to start signing in our users into our application with the Twitter API, like this:
No need for external libraries
If you want to connect your own application to the Twitter API, so you could, for example, sign in via Twitter, or later you want to make some signed requests to the Twitter API, either for you to be able to collect tweets or display some account’s tweets in your app, it’s a very simple process that you can do with Angular. This can also be completed with any other JavaScript framework easily and without the need of an external library, just making use of some REST API methods like we saw.
This has been a brief insight into how we created our Twitter app that was just part of our International team. Working collaboratively using Slack, Skype and other tools that enabled us to share our work and communicate across borders resulted in a highly functioning team that worked effectively regardless of the team members location.